Create a New Group
From Mifos home page, there are three ways of creating a group: Search Activities box, Clients drop-down menu, or via the Navigation bar.
- In Search Activities box, start typing the text create group. The field auto-populates. Press Enter. The Create Group page opens. Provide details in the following fields.
- Click Clients drop-down box. Select Groups. Click on +CreateGroup. The Create Group page opens.

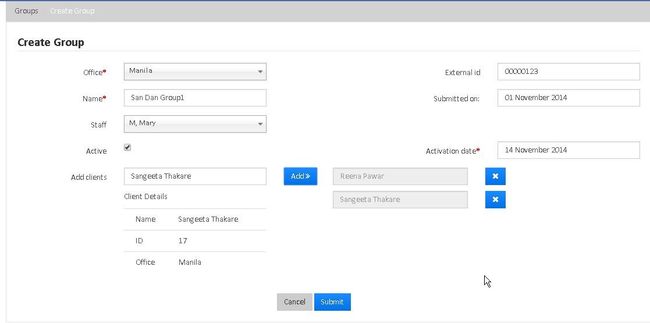
Once the Create Group page opens. Provide details in the following fields.
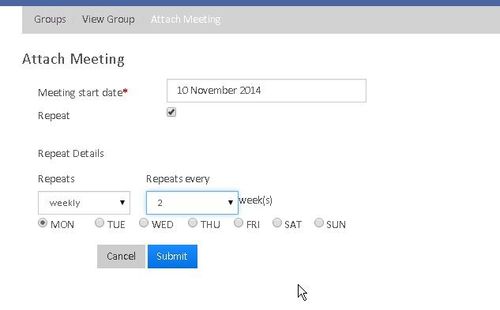
Field Name (attribute) Description Example Validations (if applicable) Office From drop-down menu, select the office to which the clients belong to in order to create their group. Name Provide the name for the group (Mandatory Field) Staff From drop-down menu select the available staff belonging to the particular office. Add Clients Allows you to select from a list of available clients Active Allows you to activate the group for specific date. Activation date Allows you to select a current or back date External id Provide External Id for the group Submitted on Provide the submission date to create group. Once the group is Created, The next step is to assign the meeting date for the group. In order to assign meeting date, go to the group and click on 'More' tab and then click on "Assign Meeting Date to see the following window:
After that the window of a specific group looks like the below image:
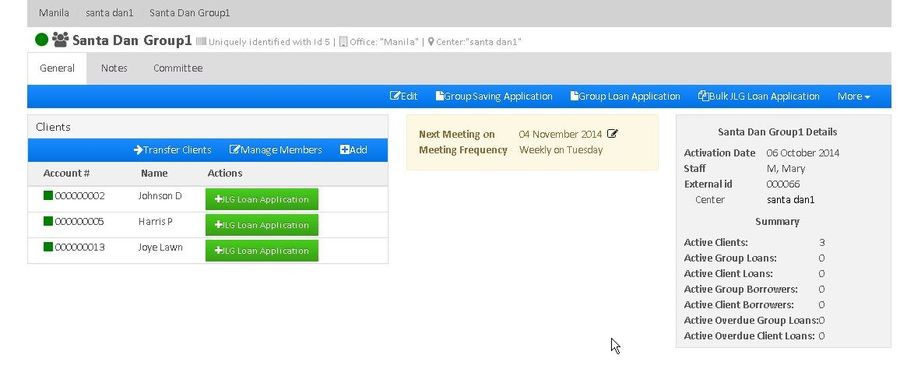

- As shown in the above image, the Group window displays:
i) The list of Clients in the group
ii) Group's next meeting date, meeting frequency and meeting day.
iii) Group Activation Date, Staff and External Id
iv) Number of Active Clients, Active Group loans, etc.
Assign Staff to a Group
- From the list of existing groups, navigate to the group you want to assign staff to.
- From the More drop down menu, select Assign Staff. The Assign Staff page opens.
- Select staff from the drop-down menu.
- Click submit.
Edit Group Details
- From the list of existing groups, navigate to the group you want to edit the details of.
- From the Group page, click Edit button. The Edit Group page opens.
Edit the following details.
Field Name (attribute) Description Example Validations (if applicable) Name mandatory field Staff Provide the new staff name External id Provide the external id for the group Activation date Provide the activation date of the group
Associate Existing Clients/members with a Group
- From the list of existing groups, navigate to the group you want to associate members to.
In the Group page, click on Manage Members tab to see the following window.

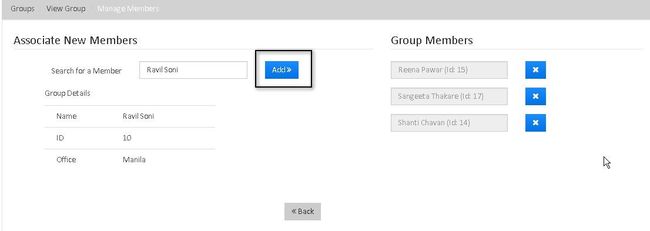
Click Add button to associate the new existing member to the group.
Assign New Members to an Existing Group
- From the list of existing groups, navigate to the group you want to add members to.
- In the Group page, click Add tab to create a client .
- Enter the details of the client (See here for how to enter the details of the client) and click submit button to add the client to the group.
- Click Submit to create the client and associate him to the group.
Transfer Clients between Groups
- From the list of existing groups, navigate to the group you want to transfer clients from.
- In the Group page, click on Transfer Clients tab to see the following window:

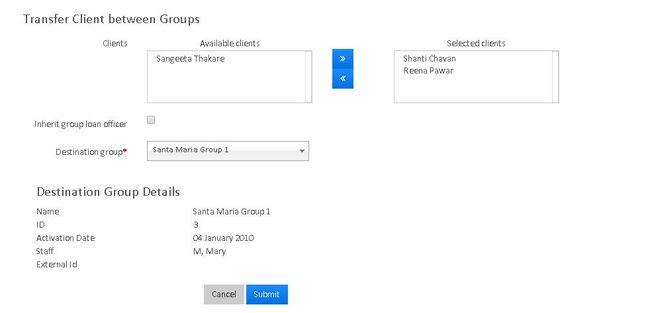
Select the desired clients and click on ">>" button and select the destination group.
- Click on submit button to transfer the clients to destination group.
Click Here to see How to create Group Saving Account
Click Here to see How to create Group Loan Account
Click Here to see How to process Bulk JLG Loan Application
| Info |
|---|
Related articles
| Filter by label (Content by label) | ||||||||||||||||
|---|---|---|---|---|---|---|---|---|---|---|---|---|---|---|---|---|
|