Prerequisite SoftwareNote the software and versions included below are a mandatory prerequisite
|
|---|
| |
|---|---|
1) Before beginning, uninstall any existing versions of Java currently on your computer. | 2) In your web browser, go to https://www.oracle.com/java/technologies/javase/jdk15-archive-downloads.html Download and Install jdk-15.0.2_windows-x64_bin.exe |
| |
|---|---|
1) In your web browser, go to https://dev.mysql.com/downloads/windows/installer/5.7.html to download MYSQL server v5.7. Or you can directly download the installer file for (windows 64bit) from my drive here | 2) Run the MySQL installation file. Click on the Typical button and then click on Next button.
|
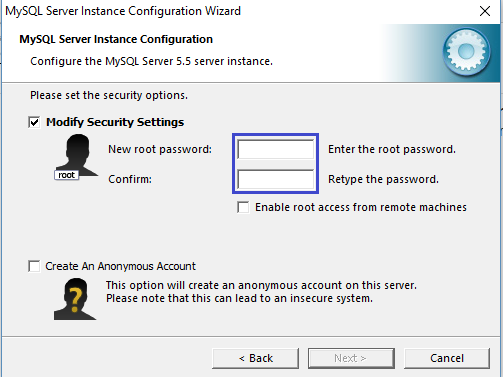
3) During MySQL installation, use Advanced Configuration > Show Advanced Options and set the MySQL ROOT Password to mysql. Then click on the Save button. This will set your username to root and your password to mysql.
|

| |
|---|---|
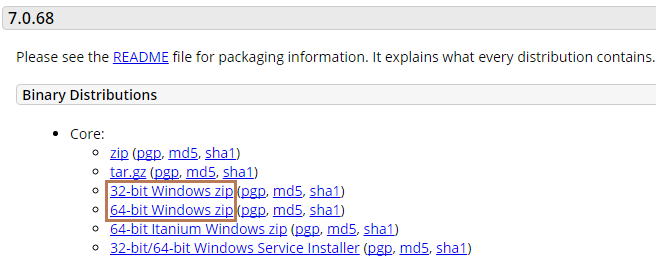
1) In your web browser, go to https://archive.apache.org/dist/tomcat/tomcat-9/v9.0.38/bin/to download Tomcat 9.0.38. >> Under the section Binary Distributions>>Core, click on the link 32-bit windows zip or 64-bit windows zip (depending on your system architecture) to download.
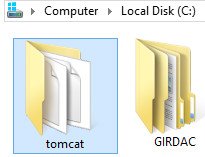
| 2) Extract the apache-tomcat-9.0.38.zip.
 |
3) Copy and paste the apache-tomcat-9.0.38 folder to the c:\ drive, then rename it tomcat.
| |
| |
|---|---|
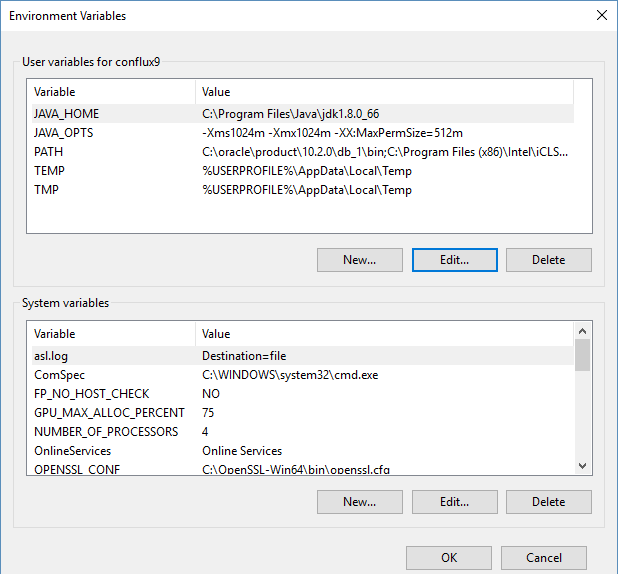
1) Open your Environment Variables:
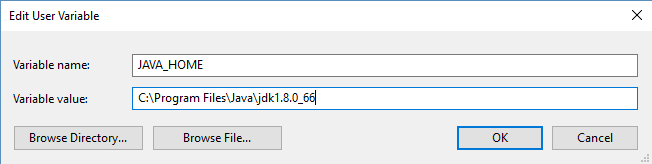
| 2) Create the JAVA_HOME variable:
|
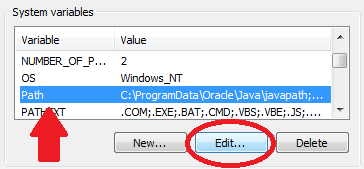
3) Edit the PATH variable:
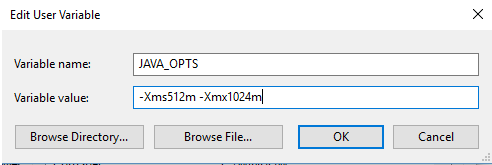
| 4) Create the JAVA_OPTS variable:
|

| |
|---|---|
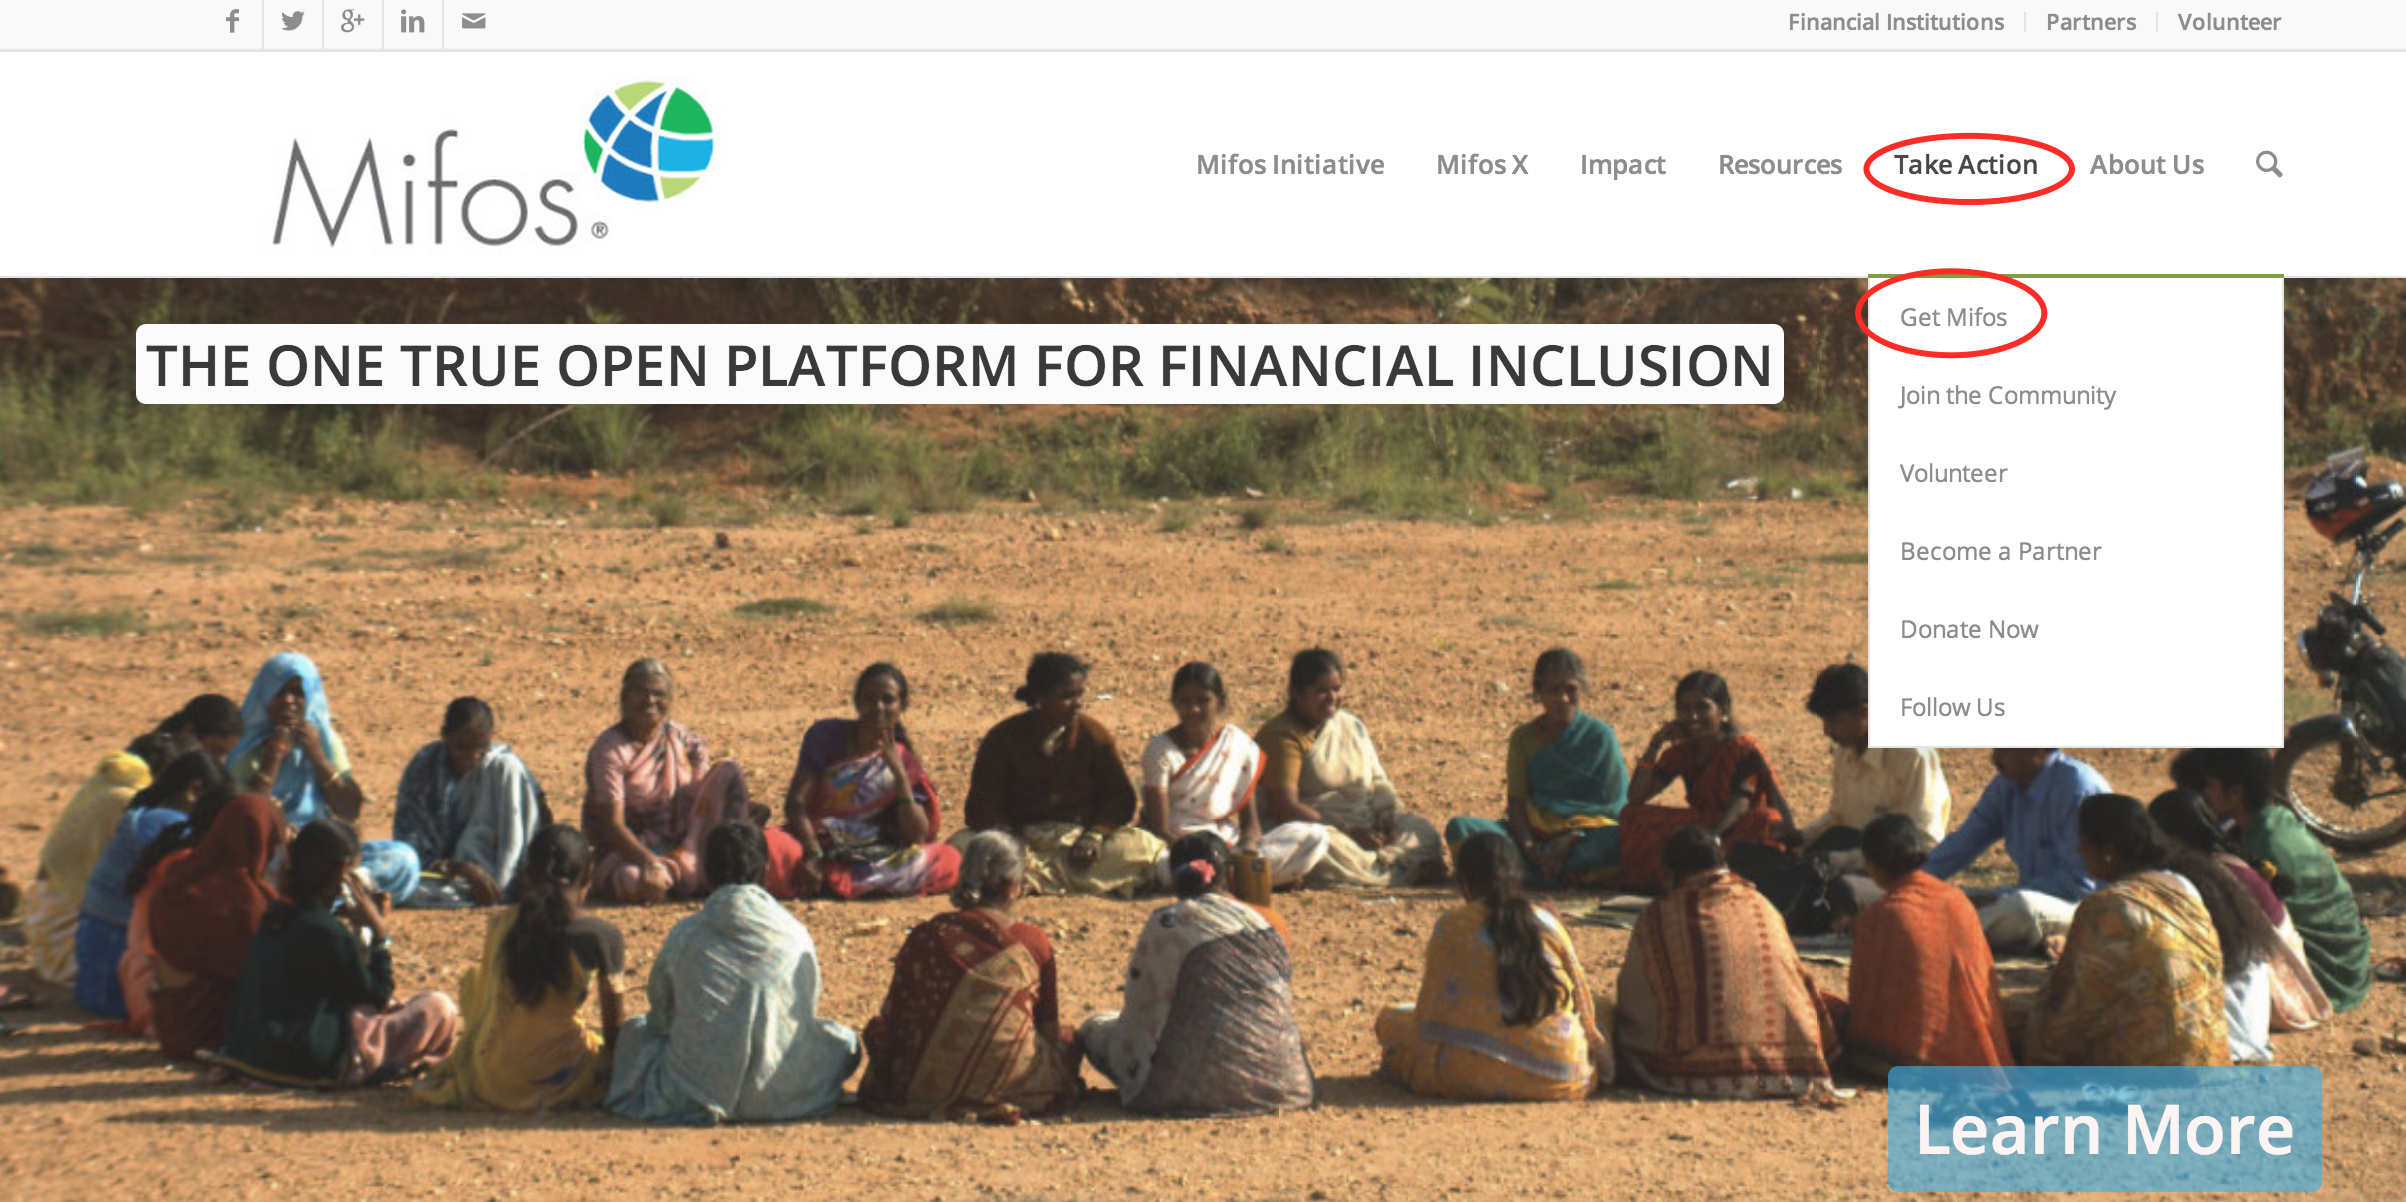
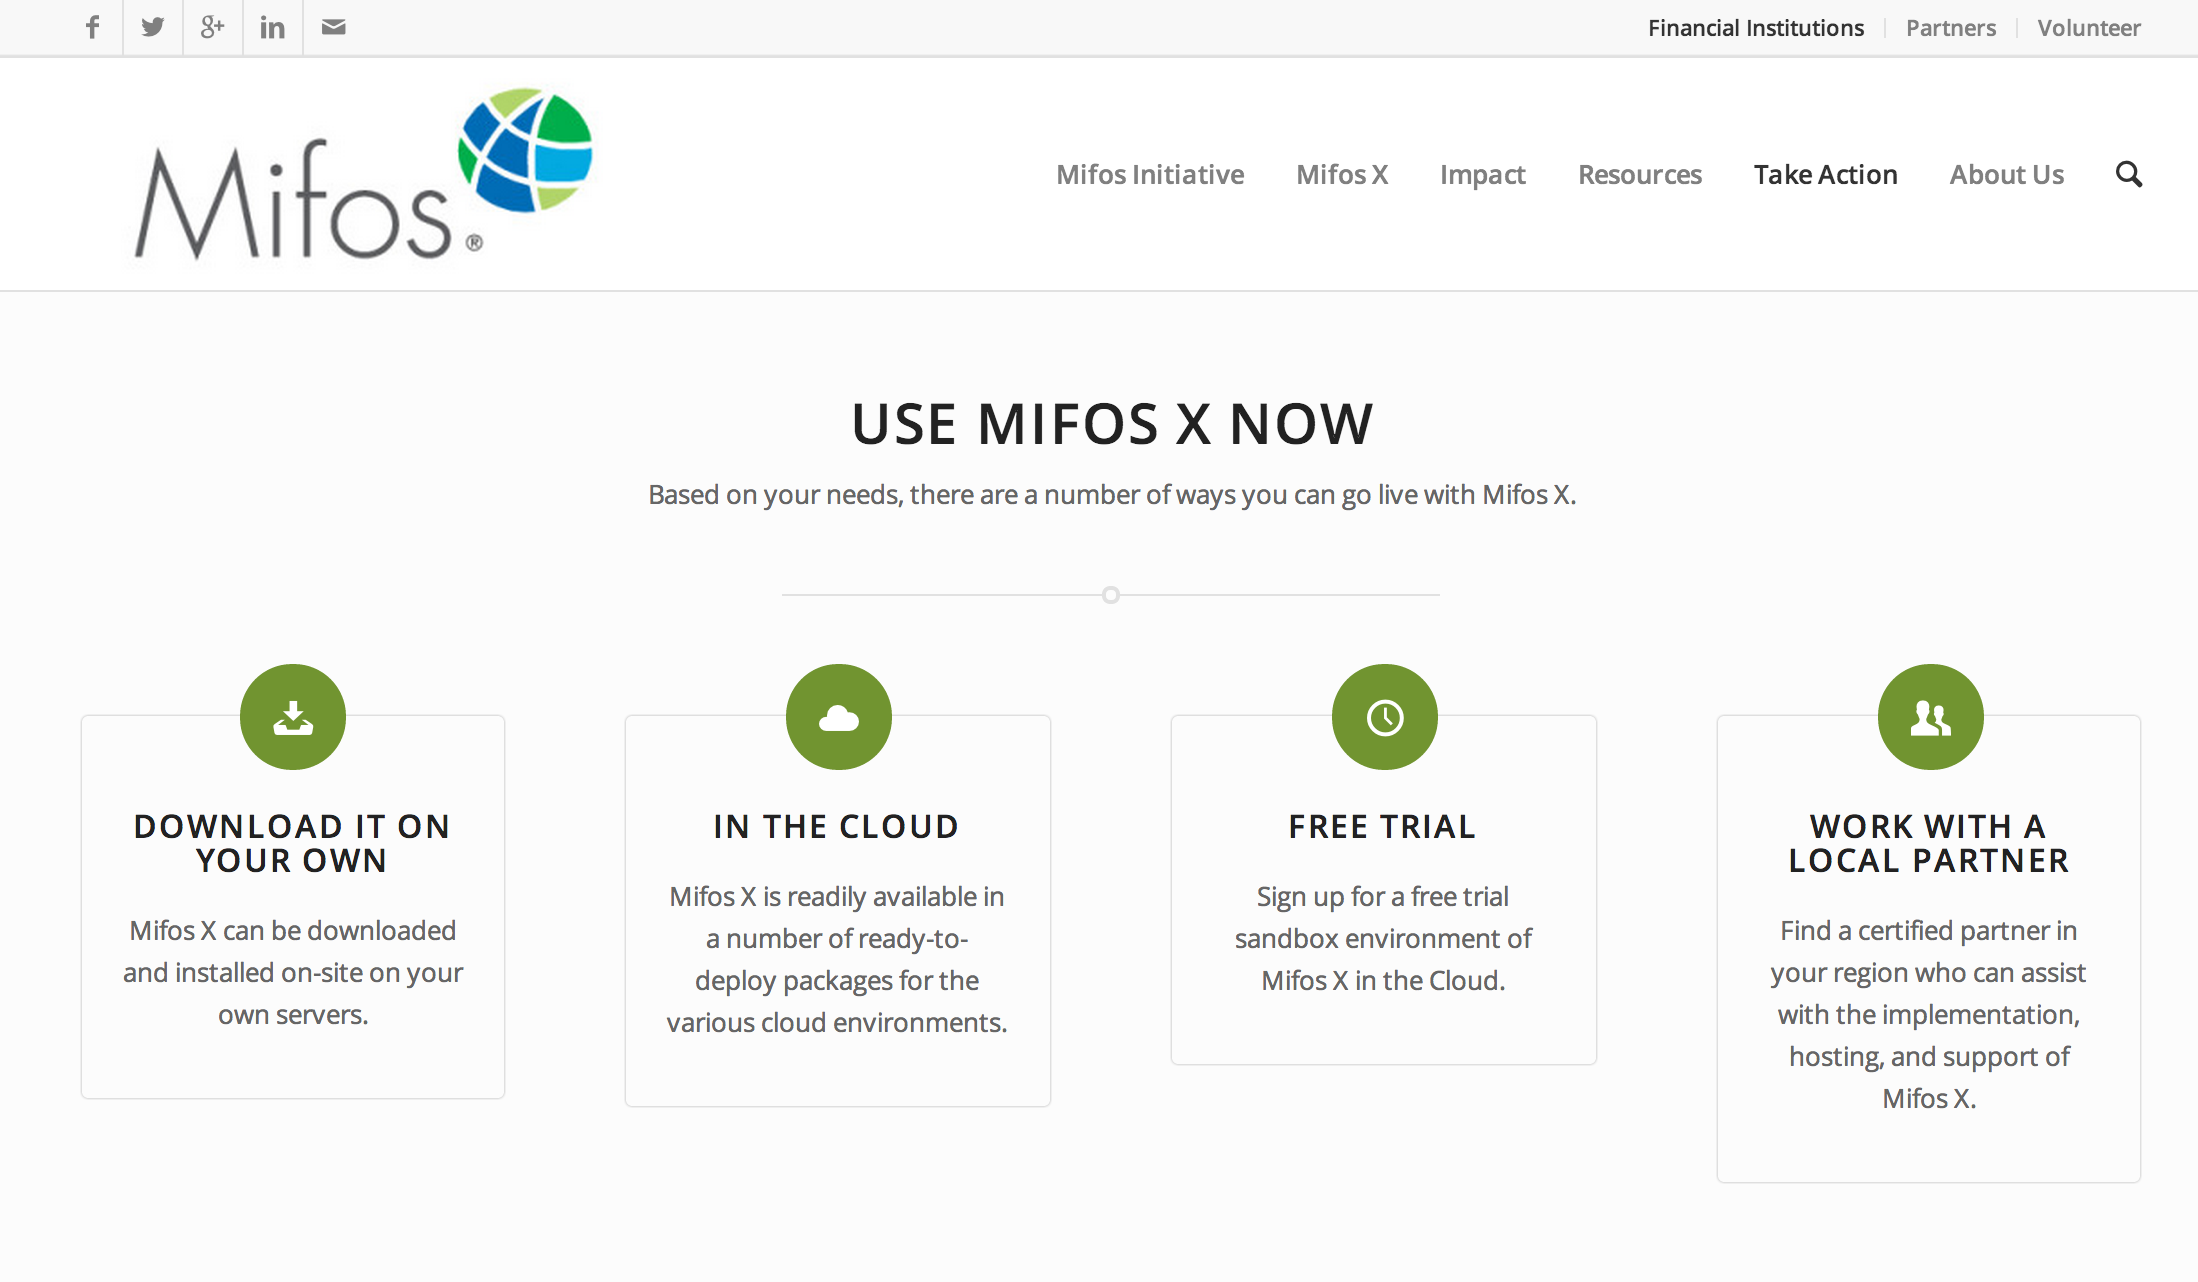
1) Go to http://mifos.org/ from your web browser and navigate to Take Action >> Get Mifos | 2) Click on the "DOWNLOAD IT ON YOUR OWN" link |
3) Click on "Download MifosX Now"
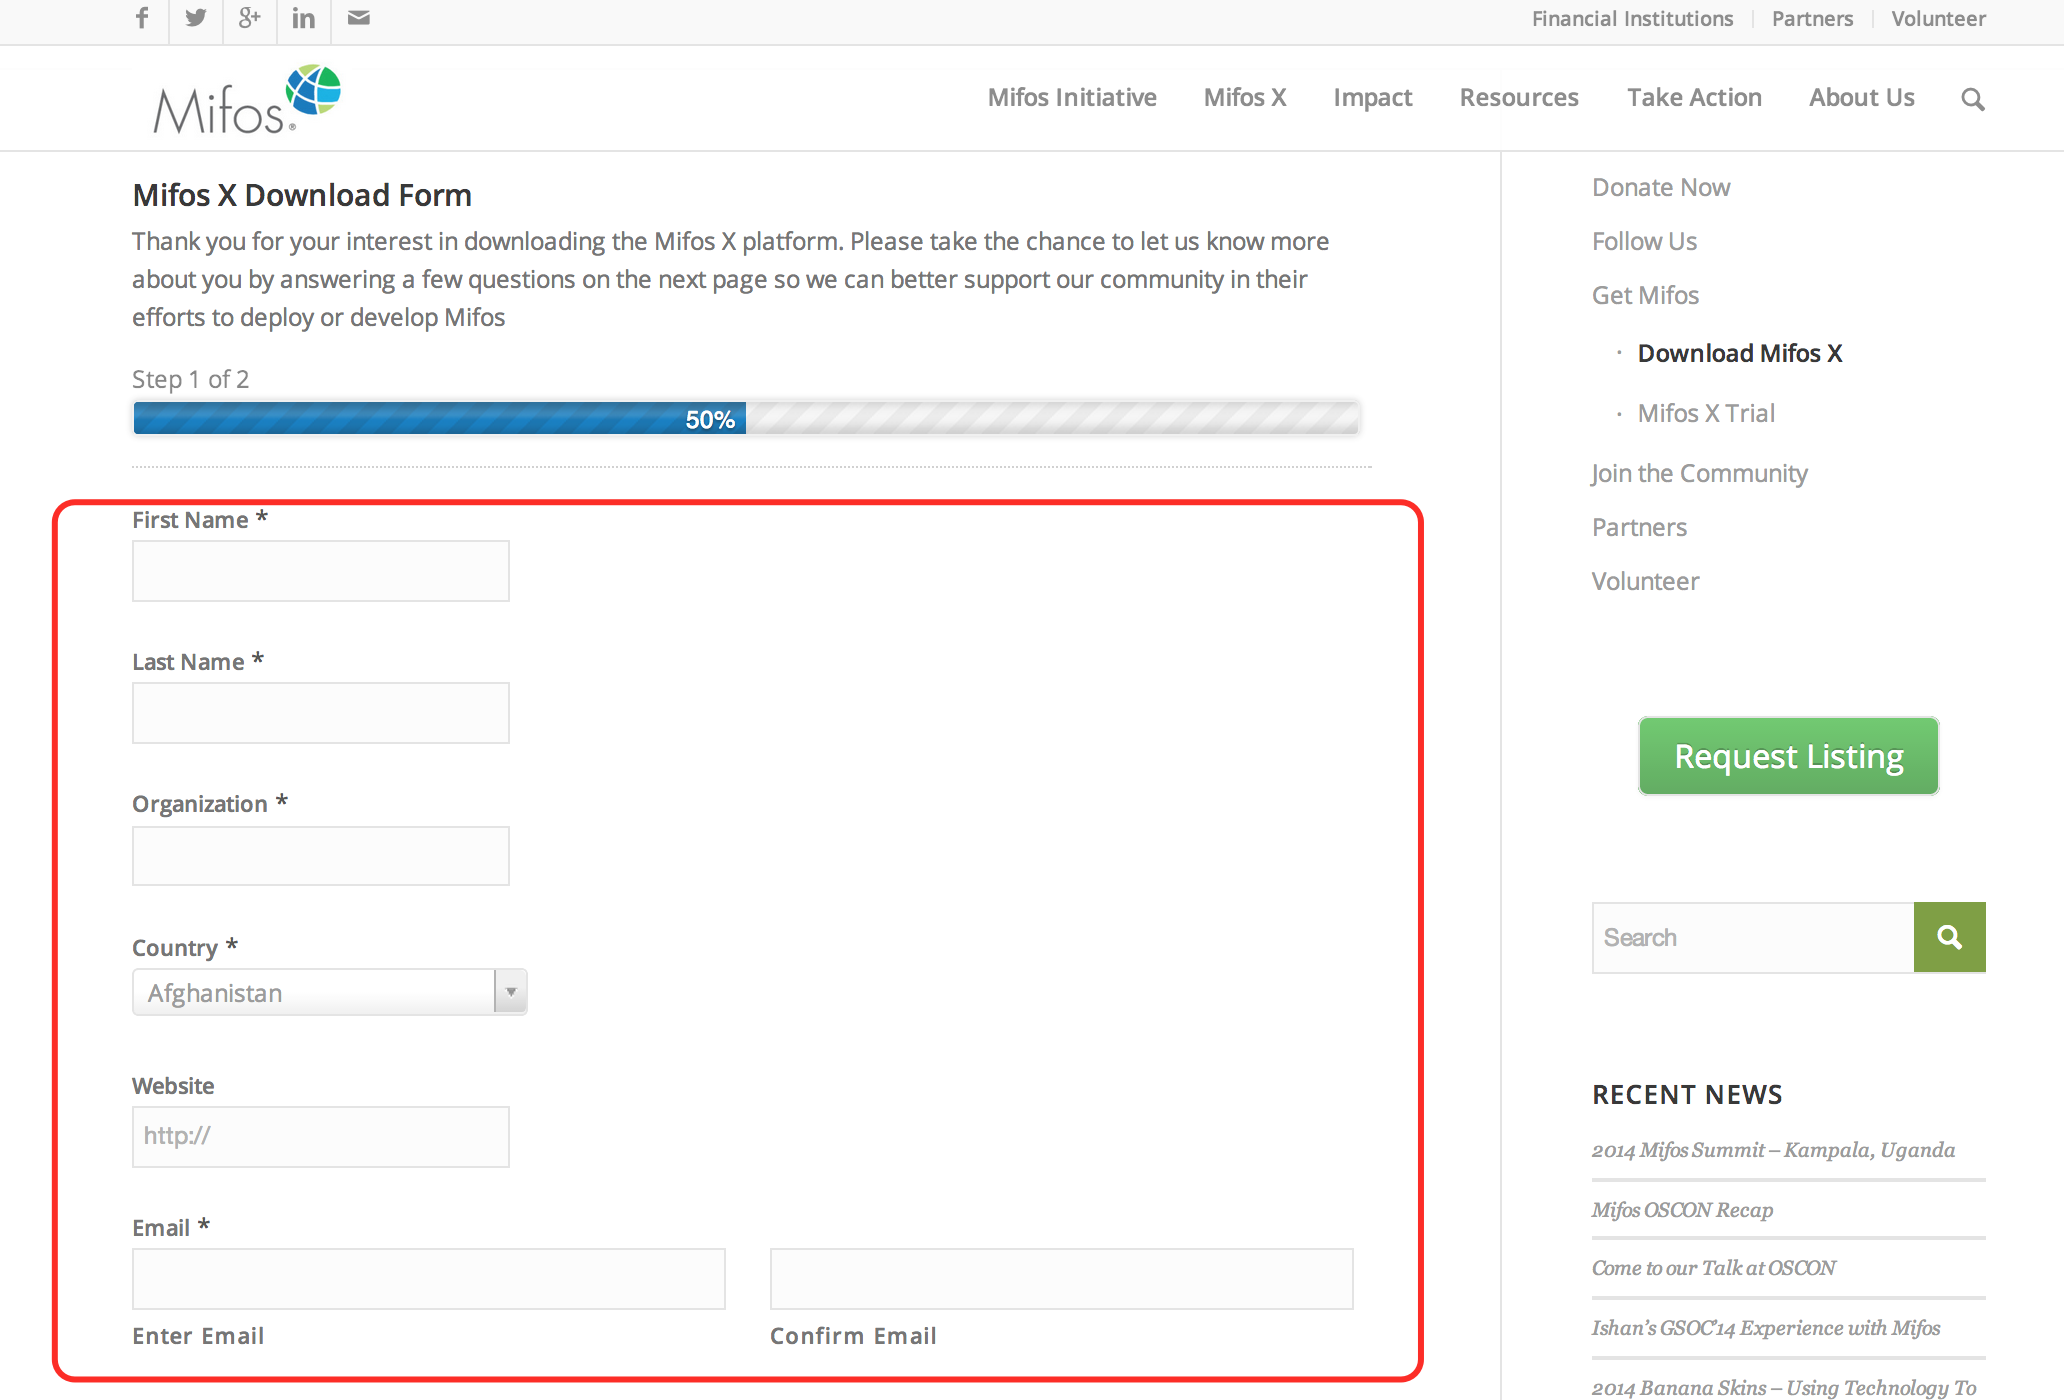
| 4) Fill out the Mifos Download Form with your information, then click the Next Page button. The download will start automatically. Note You can skip the form by scrolling to the bottom of the page and clicking on: No thanks. I would just like to download Mifos without providing additional information. However, we are able to understand and serve you better if you provide details of your organization. |
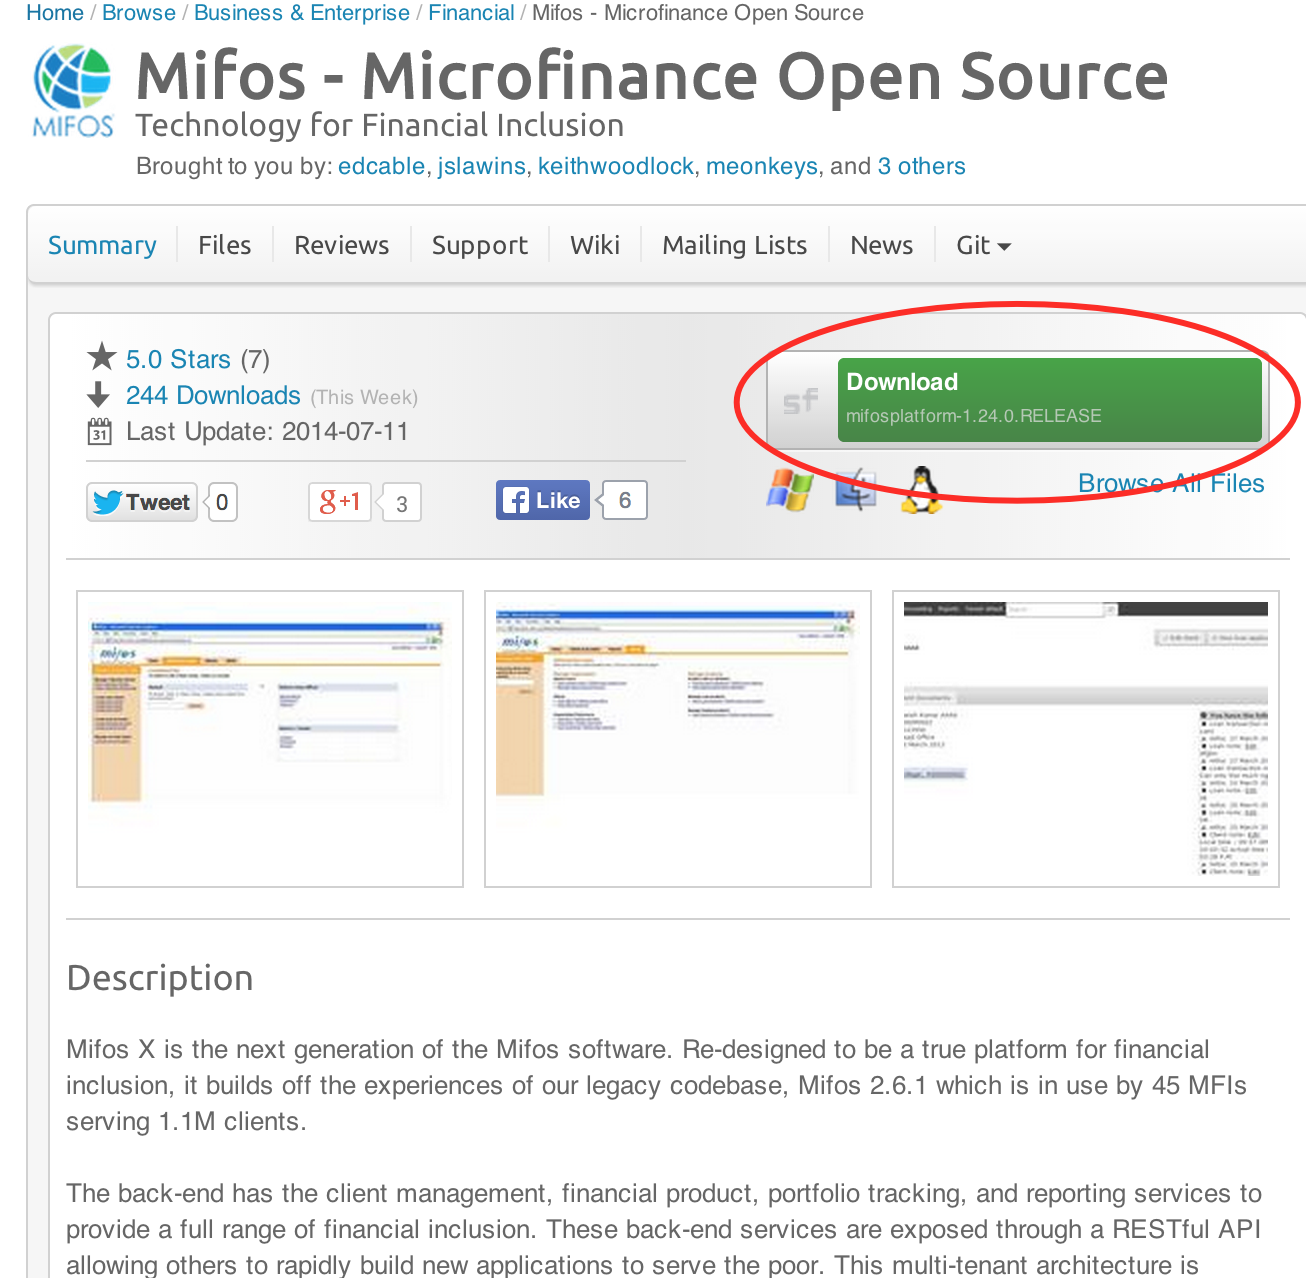
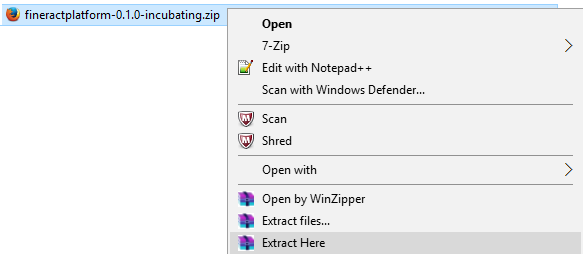
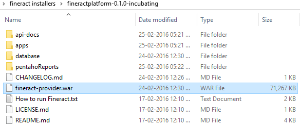
5) You will automatically be redirected to a download page for Mifos on the Sourceforge website. Here you will be prompted to download a ZIP file containing the Mifos application. Note Or You can also download other versions directly from here | 6) Once you have download the Mifos ZIP file, extract it to a new folder on your computer. Remember this location, as you will need to refer to it later.
|

| |
|---|---|
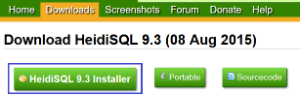
1) Download HEIDISQL from http://www.heidisql.com/download.php and save the installation file to your computer.
| 2) Run the Heidisql installation file and setup Heidisql: i) Click on local and enter the MySQL password (mysql) in the Password field. ii) Click on the Save button. iii) Click on the Open button. 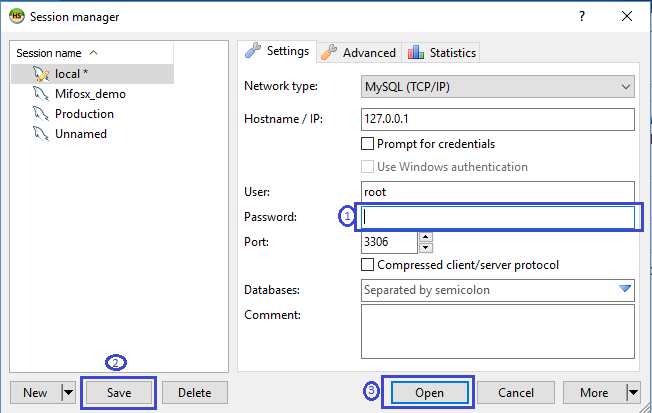 |
4) Copy the following database command and paste it into the large white box titled Query
| 5) Click on the Run button to execute the query. |


| |
|---|---|
1) Setting up the Lib folder a) Download the mysql jdbc 8.0.21 jar file from here b) Once it's downloaded, copy the file and paste it to the Tomcat>>lib folder. Note If the tomcat-jdbc.jar file is not available in the tomcat>>lib folder it can be downloaded from: http://www.java2s.com/Code/JarDownload/tomcat-jdbc/tomcat-jdbc.jar.zip | 2) Generate keystore Generate a new keystore using the Java keytool : i) Open Command Prompt keytool -genkey -alias tomcat -keyalg RSA or keytool -genkey -keyalg RSA -keysize 2048 -alias tomcat -(add a key size parameter of size 2048 as some browsers will not display the UI) Note Once the keystore is created, it should be placed in your home directory. For Example: C:/Users/john/.keystore |
3) Configure server.xml page, a) Go to tomcat>>conf, rename to server.xml file as server.bkp b)Download server.xml file from here and move the downloaded file to the folder 'tomcat>>conf' to reflect your system and settings: reflect the username and password used in step 4 of the Install MySQL section above (for e | |

Note
If your any of the server port connections are using port number 8443, then you need to change your port number to 443 in server.xml:
port="8443" maxThreads="200" scheme="https" to port="443" maxThreads="200" scheme="https"
| |
|---|---|
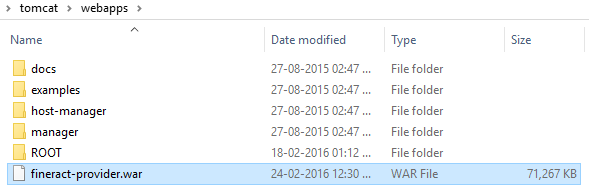
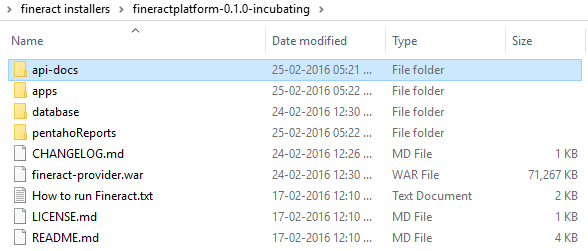
1) fineract-provider.war to tomcat>>webapps folder 1-a) Copy "fineract-provider.war" file from downloaded Mifos-platform folder |
1-b) Paste it to tomcat\webapps folder |
2) Community-app to tomcat>>webapps folder 2-a) Copy "community-app" folder from downloaded Mifos-platform>>apps folder: 2-b) Paste it to tomcat\webapps | 2-c) Rename existing ROOT folder to OLDROOT under tomcat\webapps\ 2-d) Rename community-app folder to ROOT |
3) web-app to tomcat>>webapps folder 2-a) Copy "web-app" folder from downloaded Mifos-platform>>apps folder:
2-b) Paste it to tomcat\webapps | 4) api-docs to tomcat>>webapps>>ROOT folder 4-a) Copy "api-docs" folder from downloaded Mifos-platform>>api-docs folder:
4-b) Paste it to tomcat\webapps\ROOT folder |

| |
|---|---|
1) Create .mifosx folder in home directory & paste Pentaho folder into it Use command prompt for creating .Mifos folder(make directory) i.e md .mifosx  | 2) Copy PentahoReports folder from downloaded Mifos-platform folder  |
3) Paste it to .mifosx folder
| |

| |
|---|---|
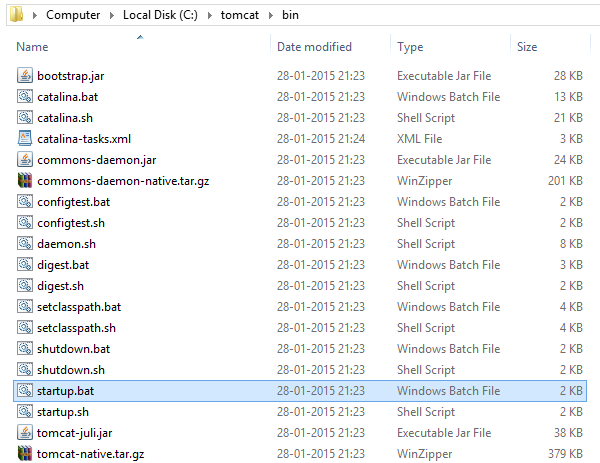
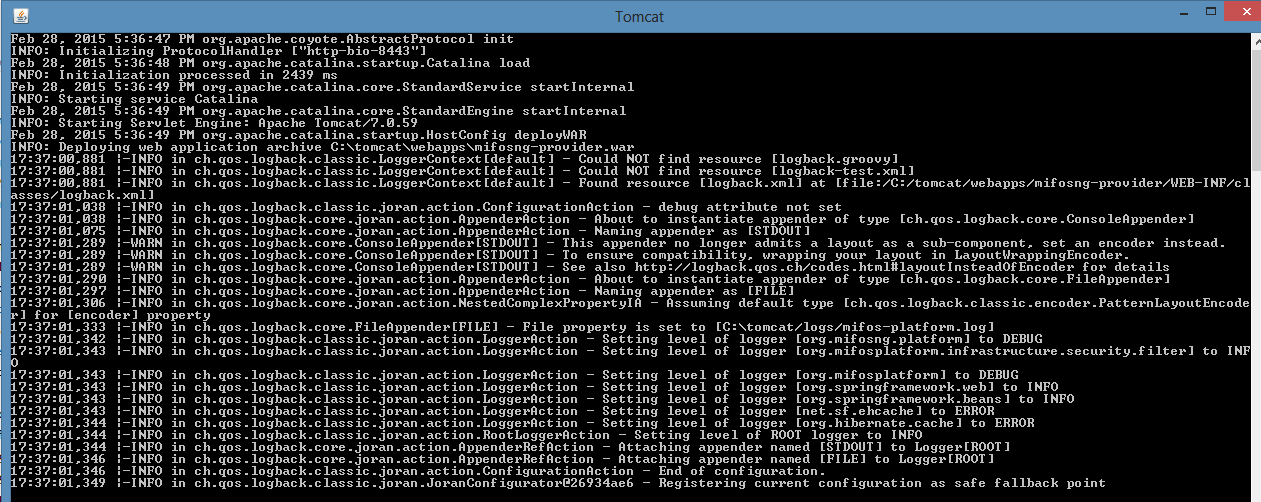
1) Go to "C:\tomcat\bin" folder, Run "startup.bat" by clicking it. Note: You can create a shortcut of "startup.bat" on your desktop and rename it as start mifosx. | 2) Application gets started |
3) Once server starts, will display as "Server startup in xxxxx ms" | 4) You could access through any internet browser:- @ https://localhost:8443 ( or any port number which you are using) To Access new UI:- @ https://localhost:8443/web-app ( or any port number which you are using) |
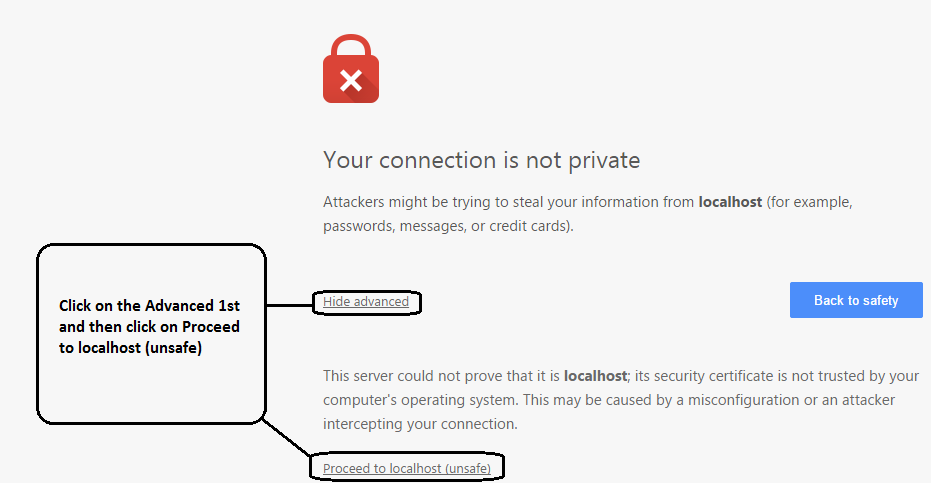
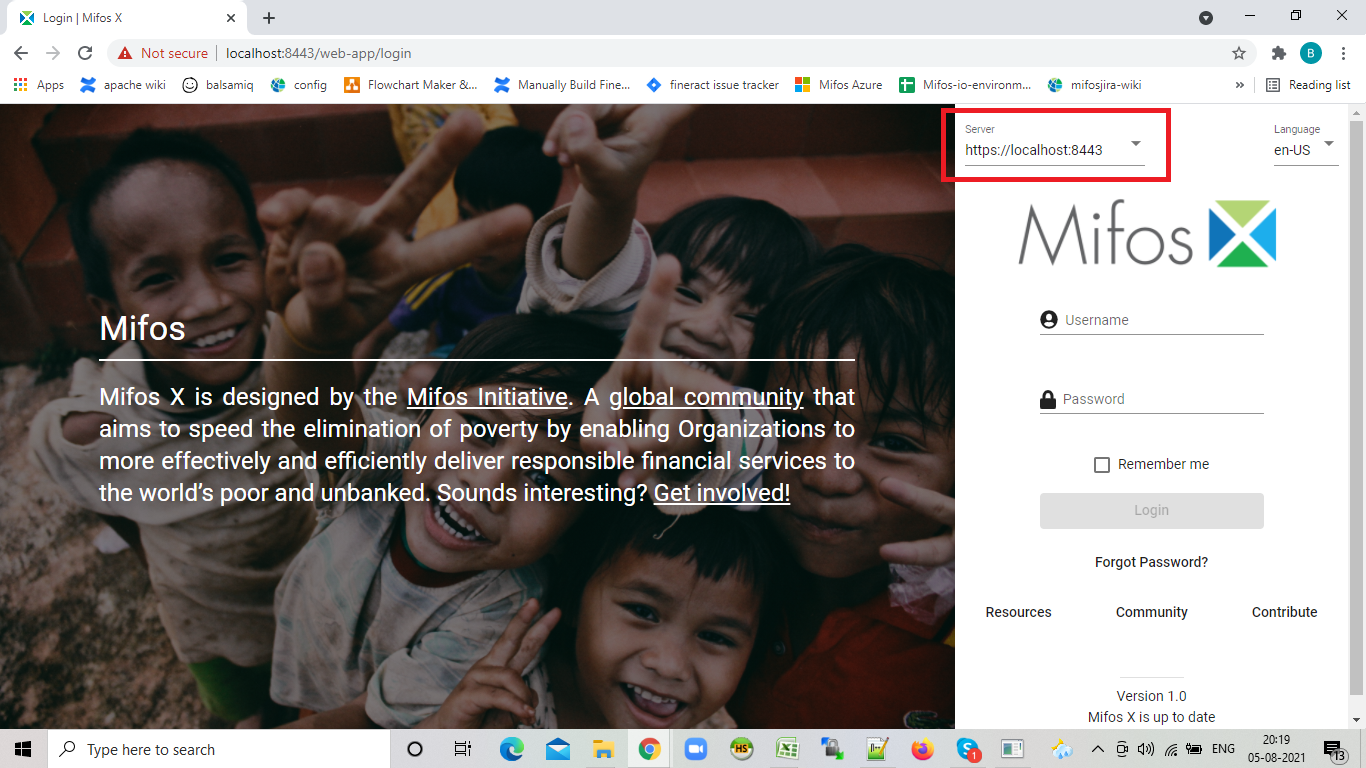
5) For the first time access it will display as shown below, please click on proceed:- | 6) Login into Mifos, Provide user name: mifos and password as: password 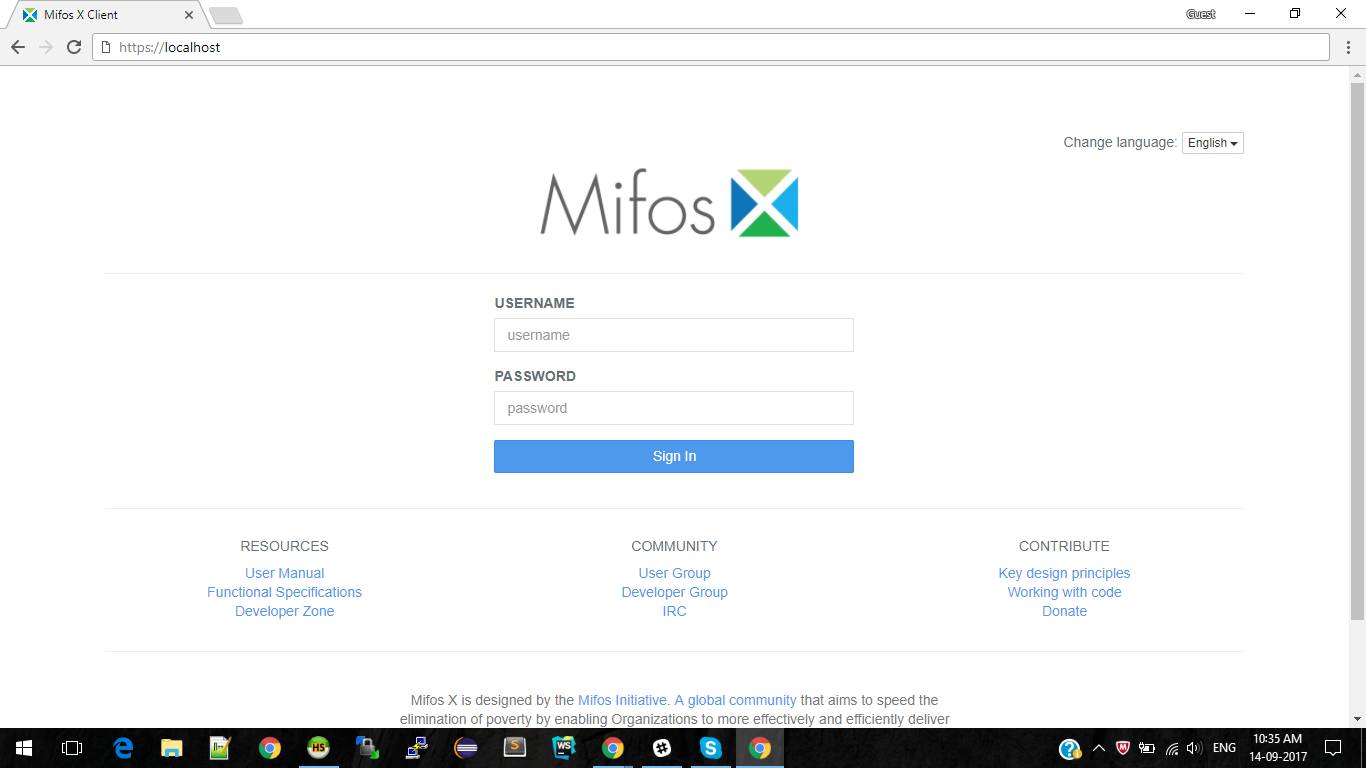
|

Stop Mifos X |
|---|
| You could stop by pressing ctrl+c key on tomcat server window & Mifos X gets stopped. |
Pentaho Plugin Work
Steps to Plug Pentaho jars with Fineract
- Once you are able to successfully login, stop the tomcat server by pressing ctrl+c.
- copy all the (.JAR ) files from 'pentaholibs' folder from downloaded Mifos-platform folder (do not copy fineract-pentaho.war file)
- paste to the the location 'tomcat\webapps\fineract-provider\WEB-INF\lib'
- restart the tomcat server and login successfully.
There you go!! Pentaho reports are now available for your analysis ![]()

- Platform application should be available @ https://[public DNS]/fineract-provider/api/v1/offices?tenantIdentifier=default&pretty=true, and this API should return JSON format text with office details
- API docs should be available @ https://[public DNS]/api-docs/apiLive.htm
FAQs
FAQ 1:- If you are able to log-in to the application successfully, but Pentaho reports are not working
NOTE
FAQ 2:- Pentaho reports are working fine, only a few are throwing the error "Failed to load content using value C:\Users\hp1\Desktop\MIfosX_unofficial_logo.png"
1.This is error is because the logos were not removed from some reports when we upgraded the Pentaho version to 7.00.6.25
2. If you come across such reports, you could simply remove the logo and send PR and contribute to the community or you can work around this by placing a logo inside of pentahoReports folder and name it 'MIfosX_unofficial_logo.png' to resolve the error on your installation.
FAQ 3:- Not able to login / Connectivity Issue on Community-app
FAQ 4:- Not able to log-in through web-app UI
Related articles