Installation of Mifos X through github
Prerequisite Software's
Note:- Below are mandatory prerequisite softwares with mentioned versions only
JAVA DEVELOPMENT KIT >> VERSION 1.8.0_65 & above
MYSQL SERVER >> Version 5.5 or 5.6
GITHUB
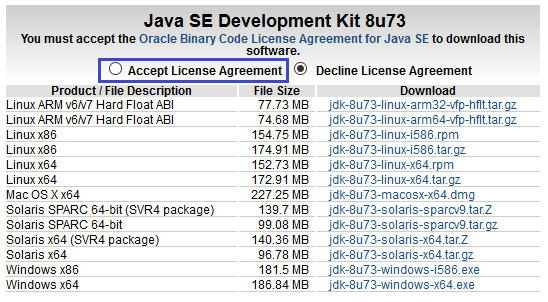
1) Before beginning, uninstall any existing versions of Java currently on your computer. | 2) In your web browser, go to http://www.oracle.com/technetwork/java/javase/downloads/jdk8-downloads-2133151.html, to download JAVA 1.8. |
3) Oracle requires that you read the license agreement, then click the button labeled Accept License Agreement. | 4) Click the link to download with respect to you system architect i.e Windows x86 for 32bit or Windows x64 for 64bit. |
5) Save the Java installation file to your computer | 6) Run & install the Java file. |
| |
|---|---|
1) In your web browser, go to http://dev.mysql.com/downloads/mysql/5.5.html#downloads.To download MYSQL server 5.5v. Click on download button with respect to your system architect i.e Windows x86 for 32bit or Windows x64 for 64bit. | 2) You can skip this option by clicking the link at the bottom of the page that says "No thanks, just start my download". Click on Save file to your system. |
3) Run the MySQL installation file. Click on Typical button and click on Next button. | 4) During MySQL installation, use Advanced Configuration > Show Advanced Options and set the MySQL ROOT Password to mysql. Then click on Save button.So your username will be root and password will be mysql. |
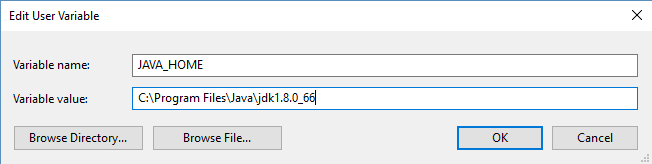
1) Open your Environment Variables: | 2) Create JAVA_HOME variable:
|
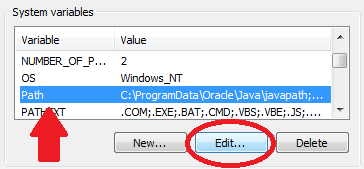
3) Edit PATH variable:
| 4) Create JAVA_OPTS variable:
|

1) Create new directory ex: fineract |
2) Open git bash, through git bash >> Go inside the created folder(ex-fineract) then execute, this will download platform code:- git clone https://github.com/apache/incubator-fineract.git
Wait for download completion and move to next step once it's done. |
3) Go to, incubator-fineract>>fineract-provider then execute below command gradle clean dist once successful move to next step | 4) Go to incubator-fineract\fineract-provider\build\distributions>>then unzip fineract-platform |
Initialize MySQL data | |
|---|---|
1) Download HEIDISQL from:- http://www.heidisql.com/download.php and save the installation file to your computer. | 2) Run the Heidisql installation file & setup Heidisql: i) For local - Provide mysql password as mysql. ii) Click on Save button. iii) Click on open button. |
4) Copy the following database command and paste it into the large white box titled Query
| 5) Click on Run button to Execute the query. . |
6) On heidisql, click on File>>Load SQL file.. | 7) Through Load SQL file window,
Run the first-time-install script, by clicking Run Query button and once it's successful close heidisql application. |
1) Open git bash, through git bash >> Go inside the created folder(ex-fineract) then execute, this will download community-app:- git clone https://github.com/openMF/community-app.git  Wait for download completion and move to next step once it's done. | 2) Go inside the created community-app folder then execute npm install -g bower bower install npm install grunt serve |
3) Open new git bash, then go inside the folder and execute "fineract>>incubator-fineract>>fineract-provider" gradle clean tomcatRunwar | |
Once the server gets started, you could access it from Mozilla firefox - internet browser: 1) First time authentication - https://localhost:8443/fineract-provider/api/v1/clients?tenantIdentifier=default | 2) Go to fineract folder >>community-app>>app>>and open index.html, this will run in your internet browser. ex:- file:///F:/fineract/community-app/app/index.html |
3) Now extend below mentioned url infront of index.html line as mentioned below:- ?baseApiUrl=https://localhost:8443/fineract-provider/api/v1?tenantIdentifier=default#/home ex:- file:///F:/fineract/community-app/app/index.html?baseApiUrl=https://localhost:8443/fineract-provider/api/v1?tenantIdentifier=default#/home | And for other internet browser apart from firefox, you should run grunt server to access i.e:- Through git bash, go to fineract>>community-app grunt serve This will open:- http://localhost:9000/?baseApiUrl=https:demo.openmf.org replace baseApiUrl like shown below: |
For second & future run:- Go to fineract>>incubator-fineract To know the updates done in the latest code:- git fetch origin To get the latest code into your system:- git rebase origin/develop
Then, start server:- Go to fineract>>incubator-fineract>>fineract-provider, then execute through gitbash gradlew clean tomcatRunwar |
Key Error Messages
Below mentioned commands are shown with examples only.
Create new branch - test1
git branch test1(new branch name) origin/develop
Switching to different branch - test2
git checkout test2
Create branch - test3 and switch to new branch -test3
git checkout -b test3 origin/develop
To know which branch
git status
To know the information of latest branch
git fetch upstream/develop
To download latest code
git rebase upstream/develop
To delete the branch
git branch -d test1
To see the branches available
git branch
Note -
1) upstream or origin is called as remote,
2) While creating branch if nothing is specified then it will create as origin.
3) develop or master are called as branches.