...
This project involves building a standalone application for the Mifos platform. This application will enable and allow mobile money transactions such as withdrawing money, saving money to be carried out with the Mifos(fineract) platform. The Mifos X APIs and the customer self-service APIs will will be leveraged to accomplish this project.
...
- NodeJS
- Bower
- Grunt JS
- Java version 1.8 and above
- MySQL 5.6 and above
- Gradle 2.x but not 3 (3 has bug known bugs and misbehaves when downloading dependencies)
...
To use this application, the engine has to be running and the database has to be setup.
Setting up the database:
- cd into the MobileMoneyTool directory: `cd MobileMoneyTool`
- cd into the mobile-money-engine directory: `cd mobile-money-directory`
- cd into the database directory: `cd database`
- import the .sql file into your database: $ mysql -uroot -p < mobile_money_application.sql
- Enter your password and that's it.
Setting up the engine:
- cd into the mobile-money-engine directory: `cd mobile-money-directory`
- cd into MM-engine: `cd MM-engine`
- Run $ gradle bootRun
- The above command downloads all the dependencies needed for the project and starts the engine.
- You can now login to the front end app on the browser using the password you use your credentials for the Mifos platform.
- Default credscredentials: Username: mifos mifos, Password: password
Configuring the Tool for your specific running platform:
...
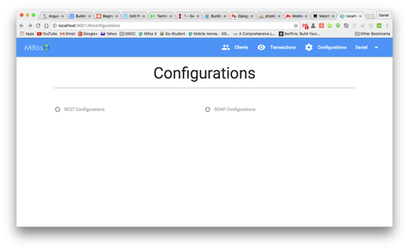
- Click on the configurations tab on the navigation bar. You should now see this:
- Select the format of your API: REST or SOAP. You should now see this:
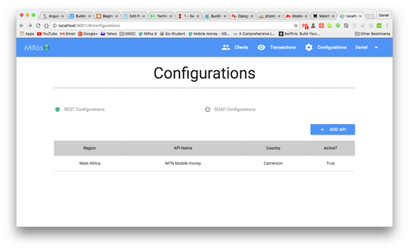
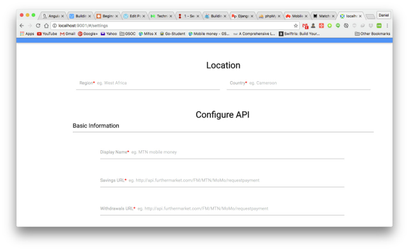
- You should now see the API currently being used. To add your API, click on the `+ ADD API` button. That now brings you to this page:
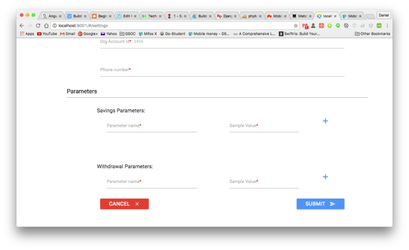
- After filling in the required information, click on the `submit` submit` button and that's it. You should now see the API added to the list of available APIs with it being active.
...