1: Go to URL on internet browser:- https://github.com/mgeiss/mifos-twilio-bridge .
>> Click on copy to clipboard i.e https://github.com/mgeiss/mifos-twilio-bridge.git.
2: On your system, Create a folder as "sms" path exexample: C:\sms.
3: Open gitbash on your system, then go to path C:\sms and clone url i.e:-
git clone https://github.com/mgeiss/mifos-twilio-bridge.git.
4: Go into to the path c:/sms/mifos-twilio-bridge, through git bash. Then execute the following in git bash:-
gradlew bootrun bootrun.
5: Signup for Twilio account:- https://www.twilio.com/.
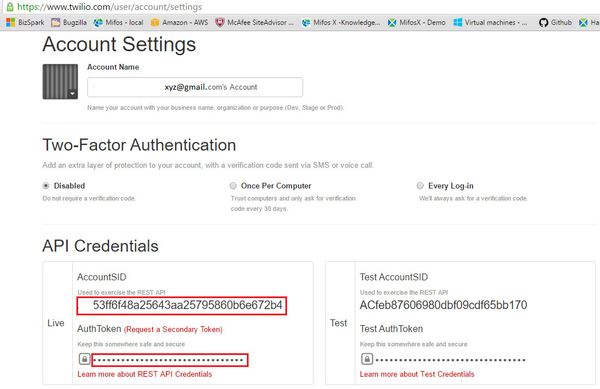
6: Go to https://www.twilio.com/, signed sign in >>Account setting, then copy necessary details as shown in below image:-
7: Go to Mifos X >>Admin>>System>>Manage hooks>>Create hook, then update necessary fields as shown in below example:-
Hook template - Select SMS Bridge .
Display Name - Provide any display name.
Payload URL - http://localhost:9191/modules/sms
Phone Number - Provide the same number, which was updated in twilio at the time of signup.
SMS Provider - Provide name of exexample: twilio.
SMS Provider Account Id - Paste above copied account id as shown in the step 5.
SMS Provider Token - Paste above mentioned token id as shown in the step 5.
Events - Select Grouping - ExExample: Portfolio Portfolio.
Events - Select entity - ExExample: Client.
Events - Select action - ExExample: Create Create.
Then click on Submit button.
8. Now you could login into mifosx mifos x and create a new client by providing phone number, the sms gets sent.
Note:-
a) Provide example is for using it on local system only. If you are looking for any other instance type like cloud, you should update the configurations in application.yml respectively.
b) If it is a free twilio account, you need to provide senders sms phone numbers.
Related articles
| Filter by label (Content by label) | ||||||||||||||||||
|---|---|---|---|---|---|---|---|---|---|---|---|---|---|---|---|---|---|---|
|