How to create Entity Data Table Checks
Step 1:
...
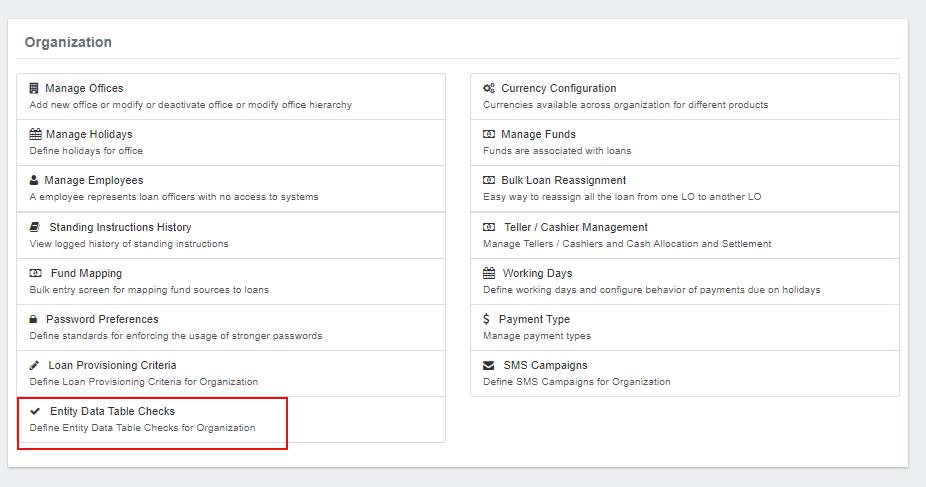
From the main screen, click on Admin then Organization from the drop down list. This will launch the Organization menu. Select Entity Data Table Checks.
...
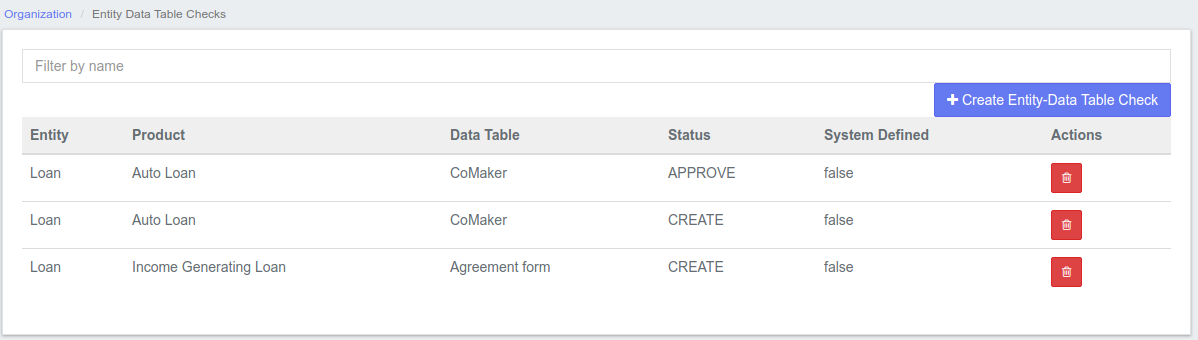
This will launch the Entity Data Table Checks
...
page.
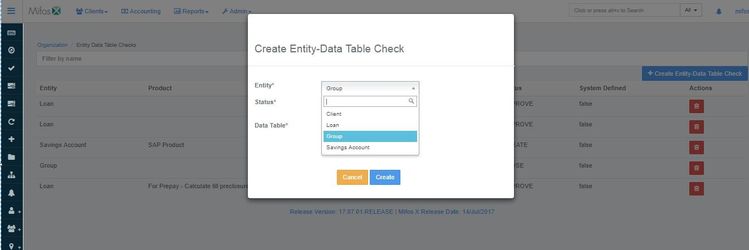
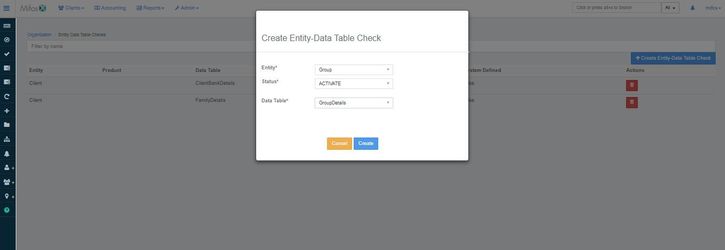
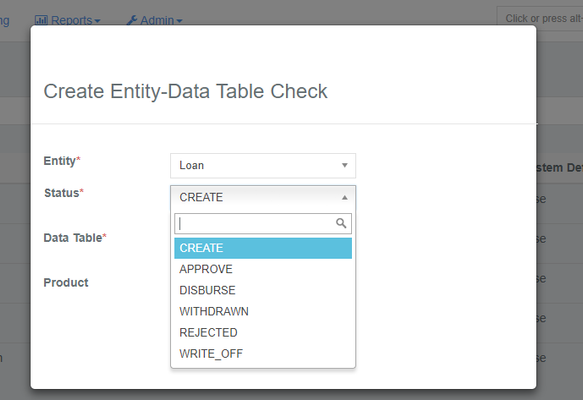
Step 2: Click the  button which will launch a pop-up box;
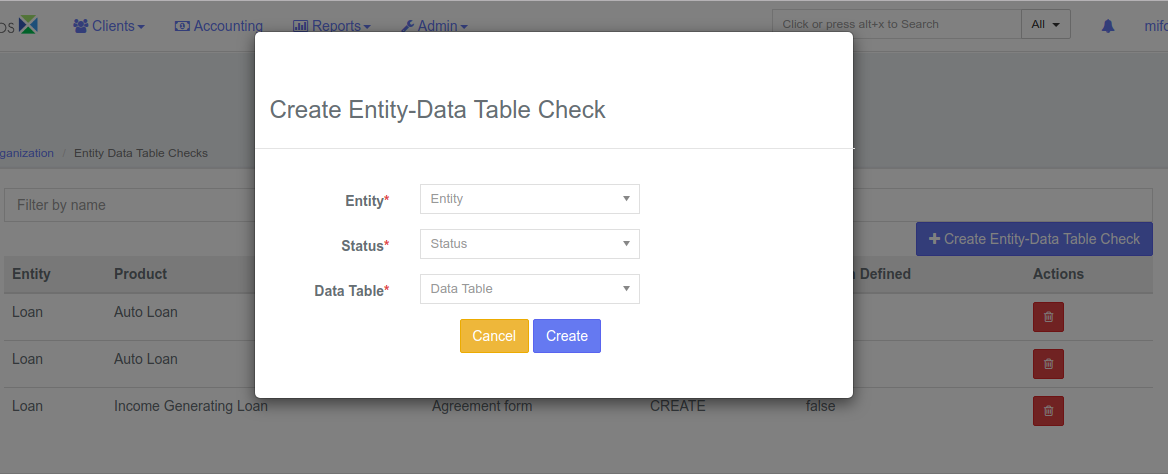
Field description
| Field | Description |
|---|---|
| Entity (mandatory) | This field describes which entity will undergo Entity Data Table Checks. Only four entities are supported with Entity Data Table Check and they are Client, Group, Loan and Saving Account. |
| Status (mandatory) | This field describes when the specified entity should undergo Entity Data Table Checks. The status is not same for all entity and the |
...
| statuses are create, approve, activate, write_off, withdrawn, rejected and close. | |
| Data Table (mandatory) | This field describes what need to be checked. |
...
| These are custom data tables which are created in the manage table. Based on the Custom Data Table created, the additional |
...
| screens are designed for the specified Entity during specified Status. All the columns given in the custom data table are displayed as fields in the additional screens created. | |
| Product | This field is enabled only for Loan and Saving Account entity. All the Loan Products are captured in the drop-down for Loan entity and all the Save product will be captured in the drop-down for Saving Account entity. |
- Any number of Entity Data Table Checks can be created for all the four entities.
...
Creating Client Entity Data Table
Navigate to the Entity Data Table Checks page and then click the +Create Entity Data-Table Check button which will launch a pop-up box. Look through the previous section of this page to get details on how to navigate to the page.
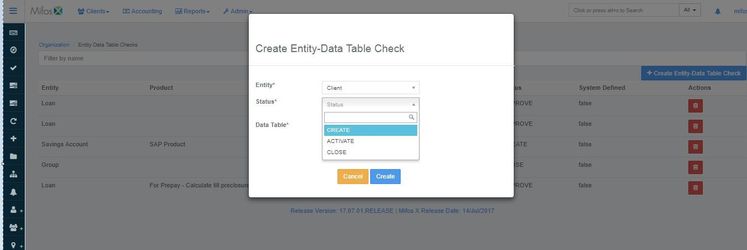
From the Entity field, select Client from the drop-down menu.
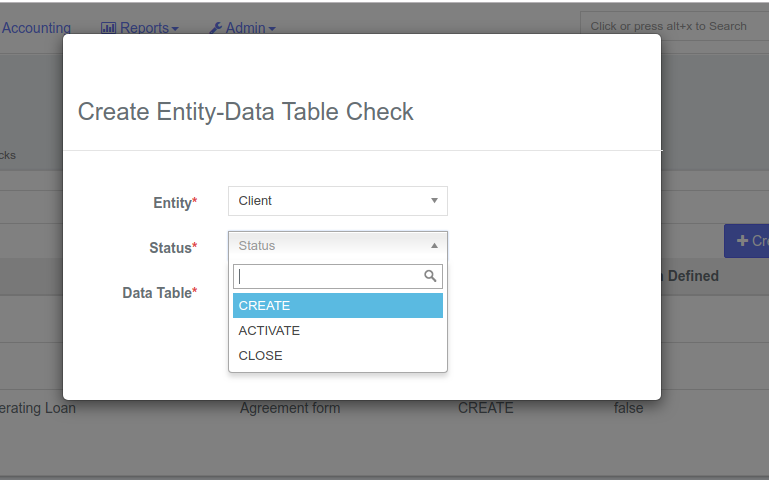
For Client entity, only three statuses are provided.
| Drop-down values | Description |
|---|---|
| CREATE | During the creation of Client, the Entity Data Table Checks are enabled |
| ACTIVATE | During the activation of Client, the Entity Data Table Checks are enabled |
| CLOSE | While closing the Client, the Entity Data Table Checks are enabled |
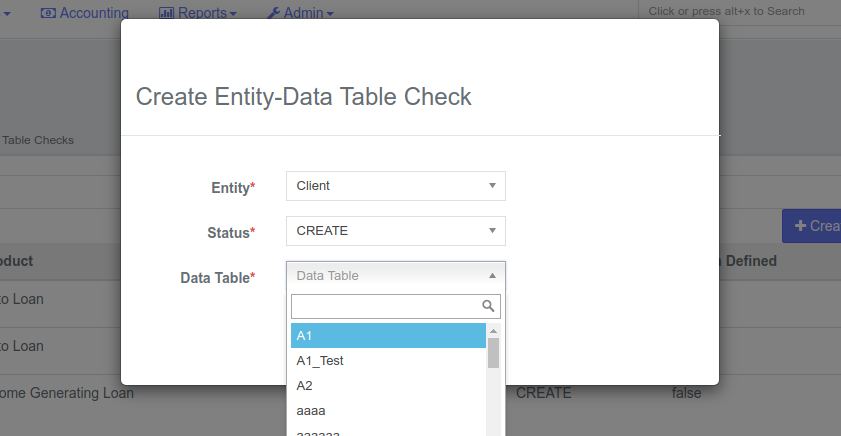
The Data Tables which are created are captured in the Data Table drop-down.
To
...
create a Custom Data Table,
...
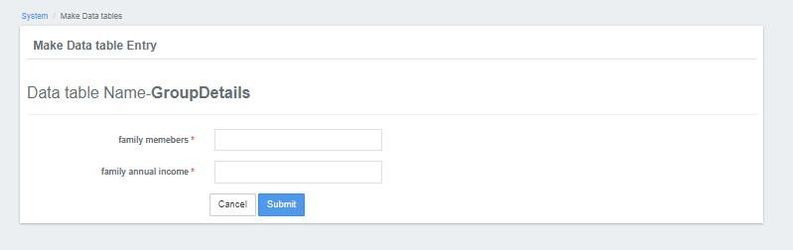
select Admin from the top of the screen and choose System from the drop-down menu. Select Manage Data Tables and click the +Create Data Table button. After creating a Data Table, you will find it listed in the Data Table drop-down menu:
For the created Entity Data Table Check, their respective pages are affected. For instance, an "Entity Data Table Check" for clients
...
has been created for CREATE status. So the create client page
...
consists of wizards as shown below. Here, two "Entity Data Table Checks" are created for create client via wizard i.e., Client Bank Details and Family Details. And their respective fields are created based on the data tables created in
...
...
page.
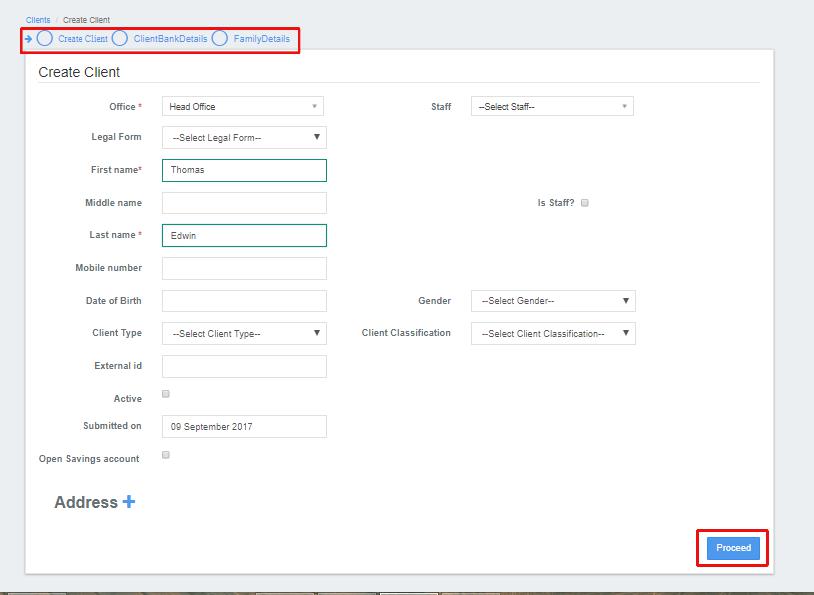
>>Create Client
This is a create client screen with additional wizard consisting Client Bank Details and Family Details. Only CREATE status will consist of wizards. For other status, additional
...
tabs will be created.
After clicking on proceed, the current screen
...
navigates to the next page.
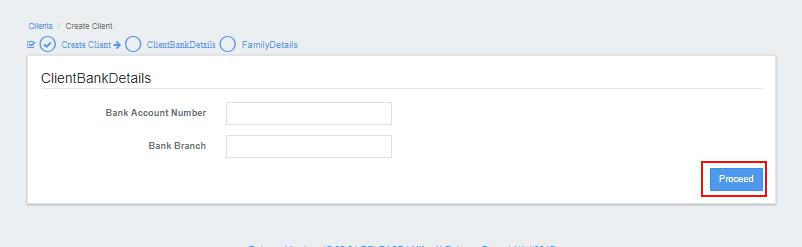
>>Create Client>> Create Bank Details
This is an additional wizard created for Client entity and CREATE status with Client Bank Details data table
...
as custom data table. Bank Account Number and the Bank Branch are the columns created in this custom data table. After clicking on proceed the current screen
...
navigates to the next page.
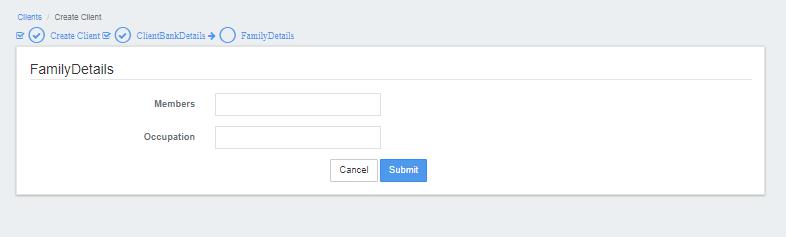
>>Create Client>> Create Bank Details>> Family Details
This is an additional wizard
...
created for Client entity and CREATE status with Family Details data table
...
as custom data table. Members and the Occupation are the columns created in this custom data table. Only after completing all the wizard screens the page will allow you to submit the Application.
If you are not providing the required details (only if the
...
field is mandatory) then an error message is shown.

Step 2.2: Creating Entity Data Table Checks for Group Entity
Group Entity has the following Status
Drop-down values Description CREATE During the creation of Client, the Entity Data Table Checks are enabled ACTIVATE During the activation of Client, the Entity Data Table Checks are enabled CLOSE While closing the Client, the Entity Data Table Checks are enabled - The data tables which are created are captured in the data table drop-down.
- To create custom data table navigate to Admin>>System>>Manage Data Tables>>Create Data Tables.
Instance 1:
...
A data table has been created for the activation of a Group and the custom data table name is "Group Details". Wizard is not facilitated for status other than create. Hence in the screen below, we can see a tab named by "Group Details" with Add button. Clicking on the Add button will navigate to the Group Details page.
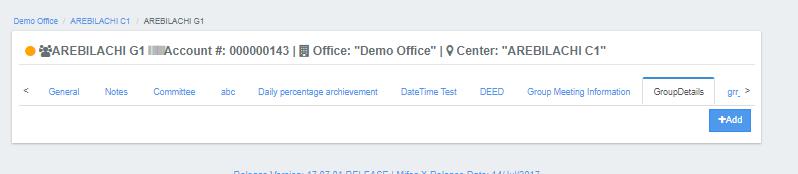
As shown in the GroupDetails screen, the fields are captured based on the custom data table created by you.
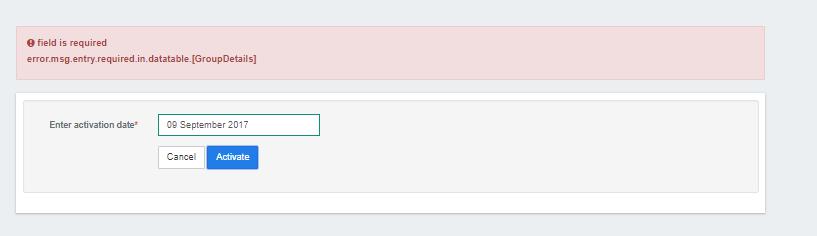
- If we are not
...
- provided the data to the custom data table based field and if we try to
...
- activate the
...
- Group, then an error message is shown as in the screen below.
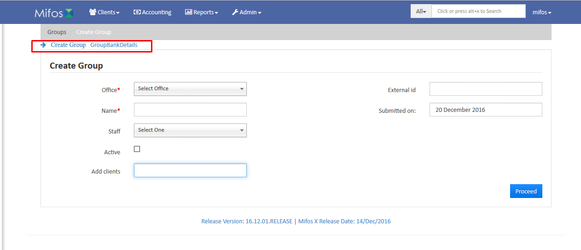
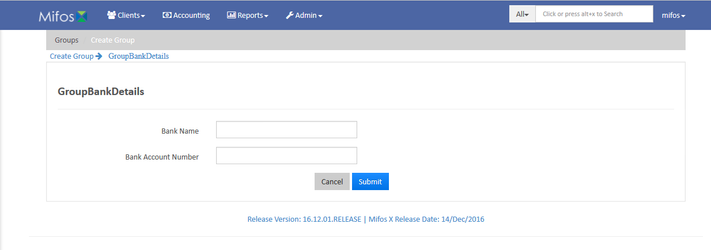
Instance 2:
...
A data table has been created for the Creation of Group and the custom data table name is "GroupBankDetails". Since the status is create the wizard come into picture. Hence in the screen below, we can see the wizard named by "GroupBankDetails" .
As shown in the GroupBankDetails screen, the fields are captured based on the custom data table created by us.
Step 2.3: Creating Entity Data Table Checks for the Loan Entity
Loan Entity has 6 Statuses as that of Client. i.e.,
Dropdown Values Description CREATE
During the creation of Loan the Entity Data Table Checks are enabled APPROVE During the Approval of Loan the Entity Data Table Checks are enabled ACTIVATE During the Activation of Loan the Entity Data Table Checks are enabled WITHDRAWN During the Withdrawal of Loan the Entity Data Table Checks are enabled REJECTED During the Rejection of Loan the Entity Data Table Checks are enabled WRITE_OFF During the Write_off of Loan the Entity Data Table Checks are enabled
- The data tables which are created are captured in the data table drop-down.
- To create custom data table, navigate to Admin>>System>>Manage Data Tables>>Create Data Tables.
- For loan entity an extra field is added i.e., Product. This
...
- field is visible only if the Loan products are already created.
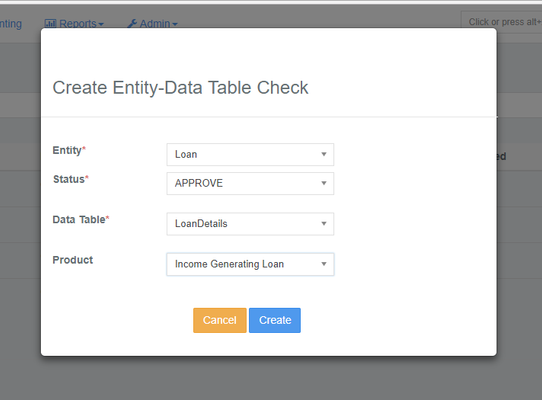
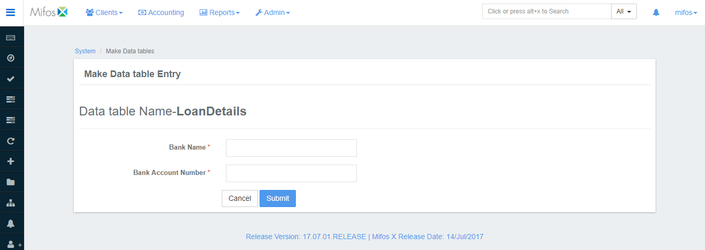
- Instance 1: A data table has been created for approval of loan and the custom data table name is "LoanDetails". Wizard is not facilitated for status other than create. Hence in the screen below, we can see a tab named by "LoanDetails" with Add button. Clicking on the Add button will navigate to the LoanDetails page.
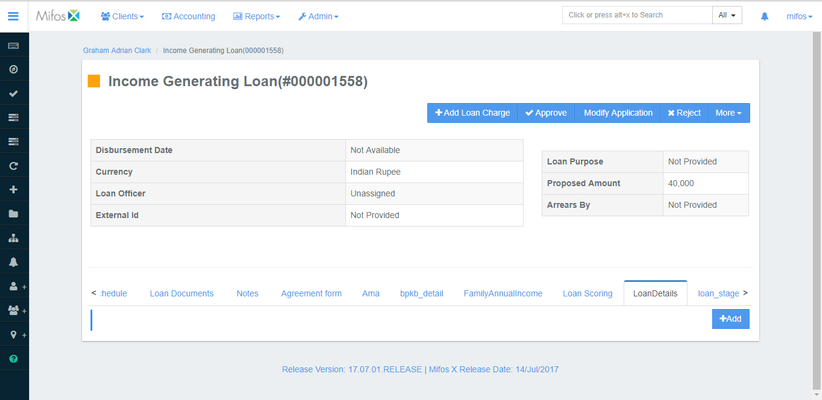
- As shown in the LoanDetails screen, the fields are captured based on the custom data table created by us.
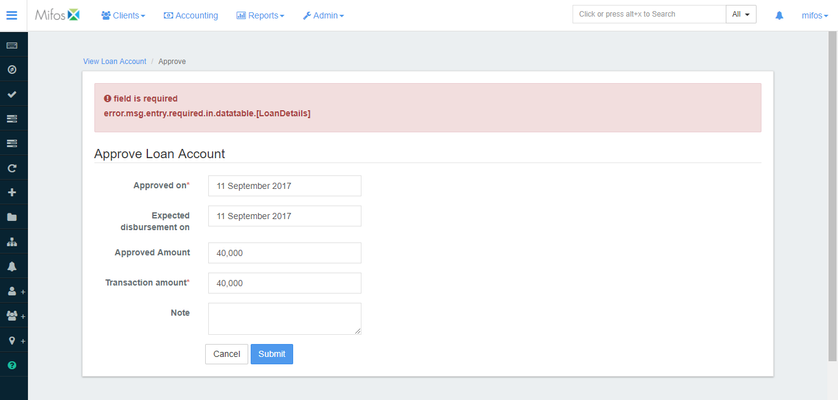
- If we are not providing the data to the custom data table based field and if we try to approve the loan, then an error message is shown as in the screen below:
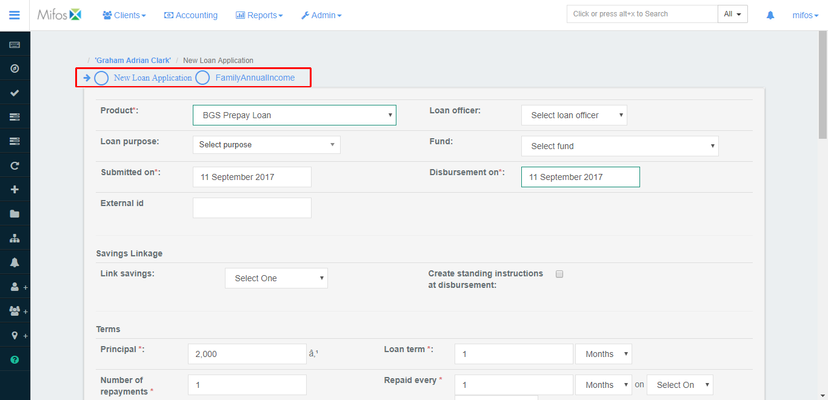
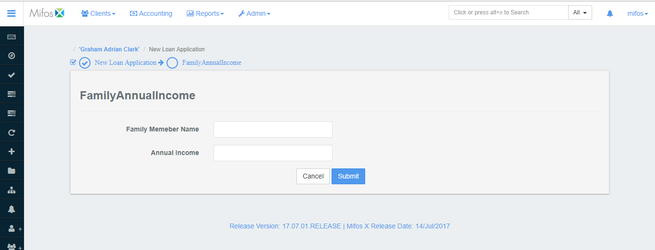
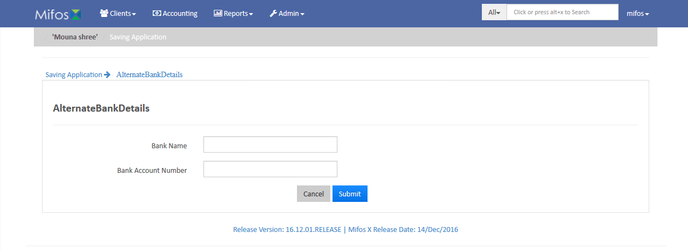
Instance 2: A data table has been created for the creation of loan account and the custom data table name is "FamilyAnnualIncome". Since the status is create the wizard comes into picture. Hence in the screen below, we can see the wizard named by "FamilyAnnualIncome".
As shown in the FamilyAnnualIncome, the fields are captured based on the custom data table created by us.
Step 2.4: Creating Entity Data Table Checks for Saving Account entity
Saving Account Entity has 6 Statuses as that of Client. i.e.,
Drop-down Values Description CREATE
During the creation of Saving Account the Entity Data Table Checks are enabled APPROVE During the Approval of Saving Account the Entity Data Table Checks are enabled ACTIVATE During the Activation of Saving Account the Entity Data Table Checks are enabled WITHDRAWN During the Withdrawal of Saving Account the Entity Data Table Checks are enabled REJECTED During the Rejection of Saving Account the Entity Data Table Checks are enabled CLOSE While Closing the Saving Account the Entity Data Table Checks are enabled

- The data tables which are created in the manage tables are captured in the data table drop-down.
- To create custom data table navigate to Admin>>System>>Manage Data Tables>>Create Data Tables.
- For loan entity an extra field is added i.e., Product. This field is visible only if the Saving products are already created.
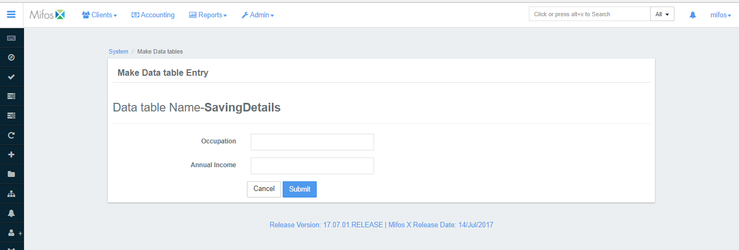
- Instance 1: For an instance a data table has been created for activation for saving account and the custom data table name is "SavingDetails". Wizard is not facilitated for status other than create. Hence in the screen below, we can see a tab named by "SavingDetails" with Add button. Clicking on the Add button will navigate to the SavingDetails page.
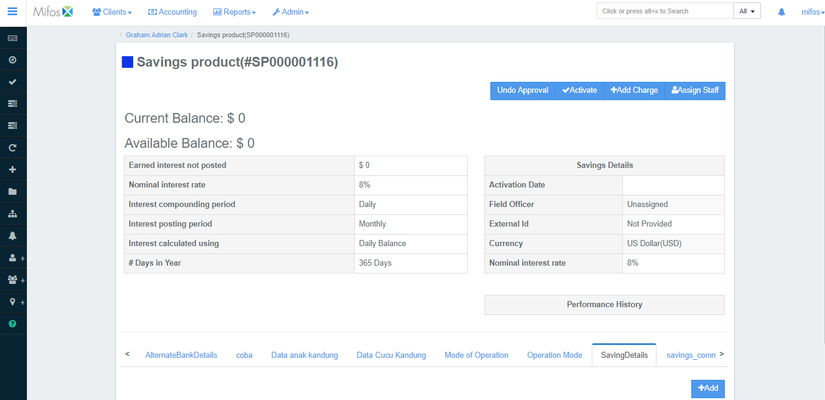
- As shown in the SavingDetails screen, the fields are captured based on the custom data table created by us.
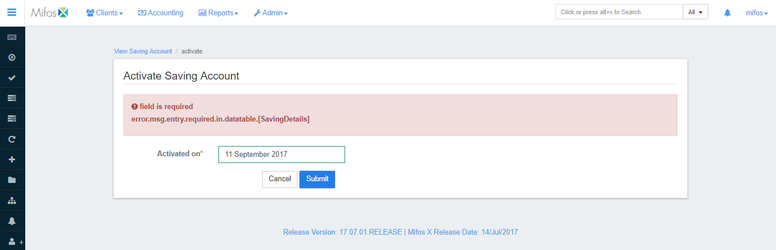
- If we are not providing the data to the custom data table based field and if we try to activate the Saving account, then an error message is shown as in the screen below.
Instance 2:
...
A data table has been created for the creation of saving account and the custom data table name is "AdditionalAccount". Since the status is create the wizard comes into picture. Hence in the screen below, we can see the wizard named by "AdditionalAccount" .
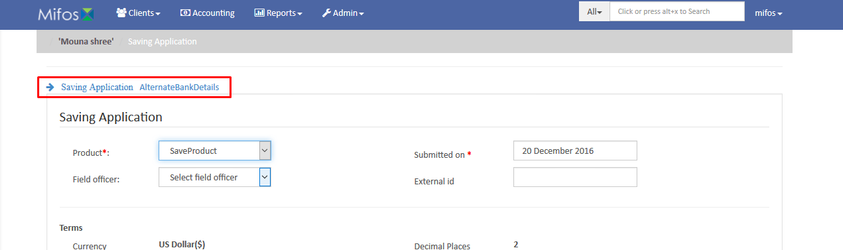
As shown in the AdditionalAccount screen, the fields are captured based on the custom data table created by us.
Wizard is supported only for the creation of Client/Group/Loan/Saving Account. It is not supported for other statuses such as activate/approve/write-off/rejected/close/withdrawal.
...
Instead statuses such as activate/approve/write-off/rejected/close/withdrawal
...
are supported by a tab.
Hence "Entity Data Table Check" is required for enhancing the existing entity details or any additional verification during certain actions like disbursing the loan, activating the Saving Account, creation of client etc.