Application users are people who work for your organization and will be using Mifos X to track all the information about your organization's operations. For example, an accountant working at a branch needs a user account in this application to track all the accounting related tasks and information. Similarly, a branch manager needs a user account to manage his/her client's portfolios.
In this section, you will learn how to add, delete or modify your organization’s users. These are people with system access working at the offices within your organization. They are subject to different restrictions based on the roles assigned to them (by the system administrator).
Before setting up usernames, the organization should give thought to the standard that will be used throughout the organization. This may be first.lastname; it may be a numerical identifier such as 101lastname (indicating the main office) or 201lastname indicating a branch office. Whatever the method adopted by your organization, it should be consistently used when creating users.
From the main screen, click on Admin then select Users from the drop down list.

Create an application user
Tip: Before you start to create User, Please ensure to have created respective Role- (Manage Roles and Permissions).
Launch this process by clicking on the blue Create User button 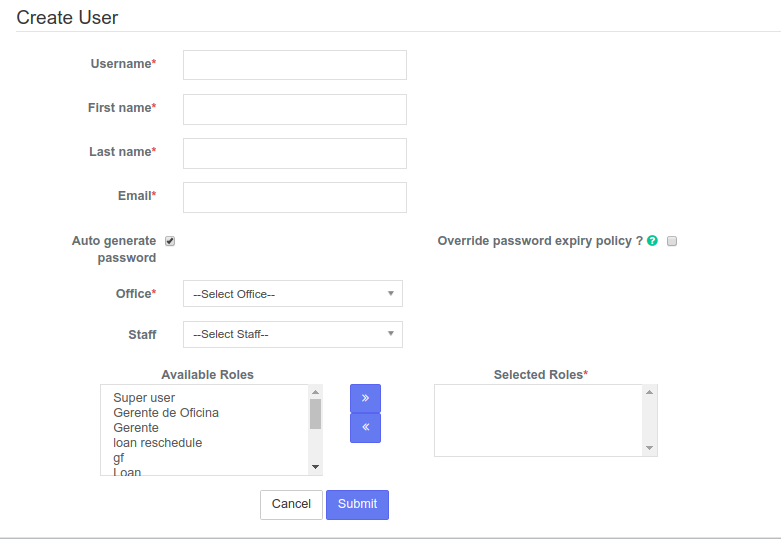 at the top-right of the Users screen. You will then be prompted to fill in a series of fields and define the new user's office and role(s):
- Username
- First Name
- Last Name

- By default, Auto generate password will be check boxed. It will send an auto generated password to the provided Email ID.
or - Alternatively, un-checking the box will enable you provide a password manually. This will give you access to the Password and Repeat Password fields that allow you to create your own password.

- Select the associated office of this user from the drop-down menu:

- Select role(s) from the multi-choice menu. To select more than one role, hold the Ctrl key while clicking on the appropriate roles. Selected roles while be highlighted in blue.

Once the information is complete, click the Submit button.
A list of users created within your organization will be generated in a chart. Information included in the chart will be;
- First Name
- Last name
- Office

Tip: Use the Filter by Name feature at the top of the screen to save time scrolling. Just begin typing the name you are looking for and Mifos X will narrow the search for you.
View Application Users
To view a user, click on their name on the chart and this will open up their profile. There will be additional information displayed such as:
- Login Name
- Roles assigned to this user

Once you have opened a user's profile, you are able to perform the following actions:
- Edit user
- Delete user
- Change a password
Edit User
You may edit the profile of current users within your organization. Follow these steps to do so:
- Navigate to the chart of current Users - If you are not sure how, please see the View Application Users section of this manual.
- Select the user you would like to edit by clicking on their name in the chart, which will launch their profile.
- Click the blue Edit button
 at the top-right of the page. This will open the user's profile, allowing you to make several changes.
Once you have opened the user's profile for editing, you may change several things such as:
- Username
- First and last name
- Selecting staff that report to this user by using the drop-down menu marked Staff:

In addition, there are two more options for editing a user profile:
Add/Remove User Role
- Use the multi-choice menu labelled Select roles to add or remove roles for this user :- hold the Ctrl key while clicking to select multiple roles. Selected roles will be highlighted in blue:

- Click Submit.
Transfer user account from one office to another office.
- Using the Office drop-down menu, select the appropriate office for this user.
- Click Submit.
Change User Password
- Navigate to the chart of current Users - If you are not sure how, please see the View Application Users section of this manual.
- Select the user whose password you would like to change by clicking on their name in the chart. This will launch their profile.
- Click the blue Change Password button
 at the top-right of the page.
 - This will launch a pop-up window:
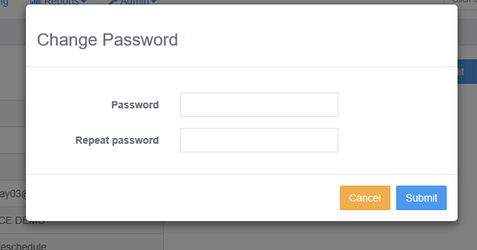
- Fill in the Password and Repeat Password fields.
- Click Submit.
Delete user
- Navigate to the chart of current Users - If you are not sure how, please see the View Application Users section of this manual.
- Select the user you would like to delete by clicking on their name in the chart. This will launch their profile.
- Click the blue Delete button
 at the top-right of the page.
 - Click Confirm.
Override password expiry policy ?
Determines whether the password does not expire for this user even if global configuration for password expiry is enabled.
This means that checking the check box will grant you access using the same password regardless of whether global configuration for password expiry is enabled.

Related articles
On this page: