Windows Installation
Download and extract the Mifos X application files
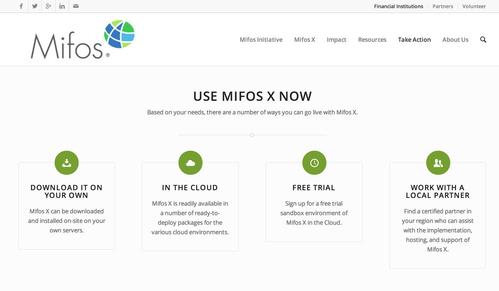
- Go to http://mifos.org/ from your web browser & Navigate to Take Action >> Get Mifos

- Click on the "DOWNLOAD IT ON YOUR OWN"
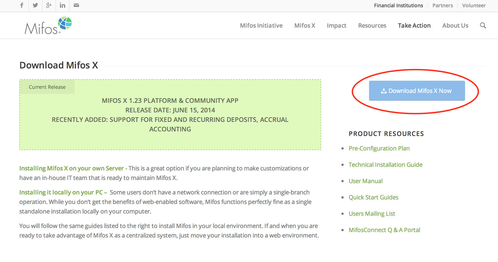
- Click on "Download MifosX Now"
- Kindly fill the Application form
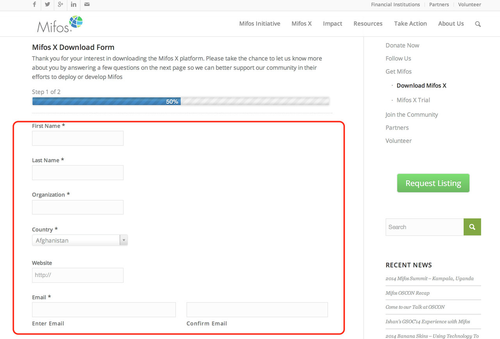
Complete the basic information on the Mifos X Download Form to provide some basic information about your organization, then click the Next Page button.
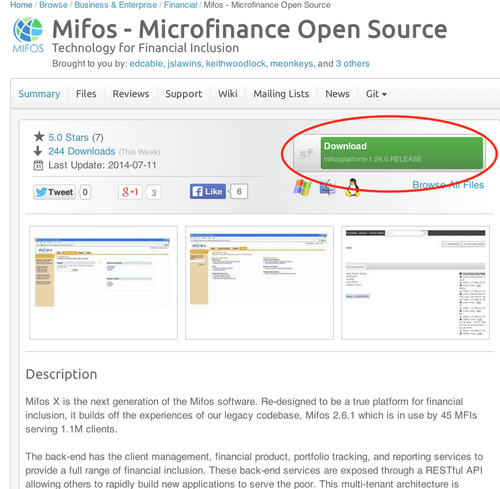
(NOTE: You may download Mifos X without providing information. However, we encourage you to provide it, as this helps us better support our community. If you don't wish to provide your information, you at the bottom of the page, No thanks. I would just like to download Mifos X without providing additional information.) The download will automatically start. - You will automatically navigate to a download page for Mifos X on the Sourceforge website, where you will be prompted to download the Mifos X application files in a ZIP format.
- Once you have download the Mifos X ZIP file, extract it to a new folder on your computer. Remember this location, as you will need to refer to it later.
- Open the folder, scroll to INSTALL.MD and open that file. The most current installation instructions are found in this file. The same file can be found at https://github.com/openMF/mifosx/blob/develop/INSTALL.md. Follow the instructions for Manual Installation.
Install Java
- Before beginning, uninstall any existing versions of Java currently on your computer.
- In your web browser, go to http://www.oracle.com/technetwork/java/javase/downloads/jdk7-downloads-1880260.html (Please refer Compatible software versions)
NOTE: For every "Java SE 7u##" in this section, the "##" represents two numbers that indicate the latest update to version 7 of Java. This is what you will see on the Java webpage.
Scroll down slightly, to the section labeled Java SE 7u##. - To the right, under JDK, click the DOWNLOAD button.
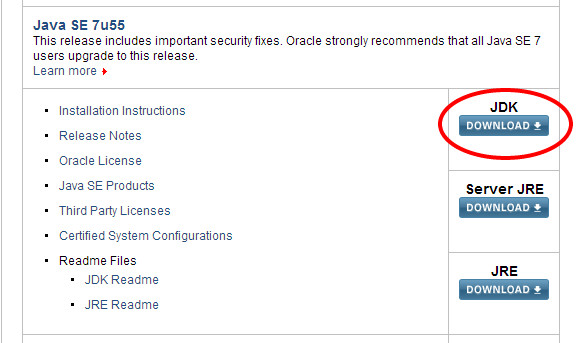
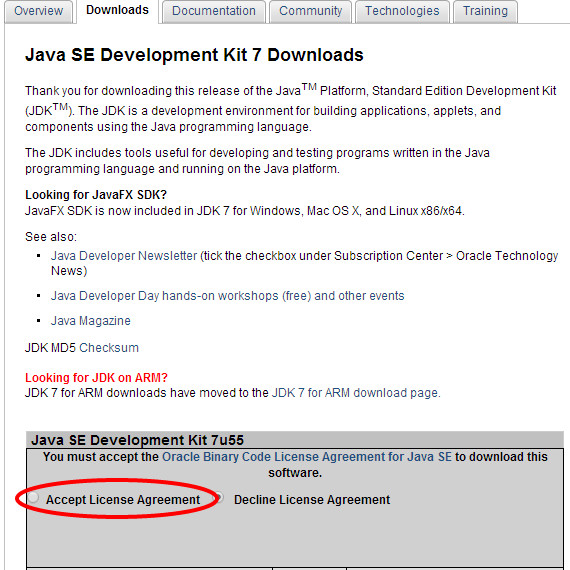
- In the box labeled Java SE Development Kit 7u##, Oracle requires that you read the license agreement, then click the button labeled Accept License Agreement.
- Click the link to download the appropriate version of Java for your operating system:
- If you are running 64-bit Windows 7 (most likely), on the row where the Product / File Description says Windows x64, click the link jdk-7u##-windows-x64.exe.
- If you are running 32-bit Windows 7, on the row where the Product / File Description says Windows x86, click the link jdk-7u##-windows-i586.exe.
- Save the Java installation file to your computer.
- Run the Java installation file. When the file is complete,
additional documentation needed in this section:
- need more detail under "Run the Java installation file"
- need to run as administrator
Install MySQL
- In your web browser, go to http://dev.mysql.com/downloads/mysql/. (Please refer Compatible software versions)
- NOTE: For every "MySQL 5.#" in this section, the "#" represents the latest update to version 5 of MySQL.
- Scroll down to the section MySQL Installer 5.6 for Windows.
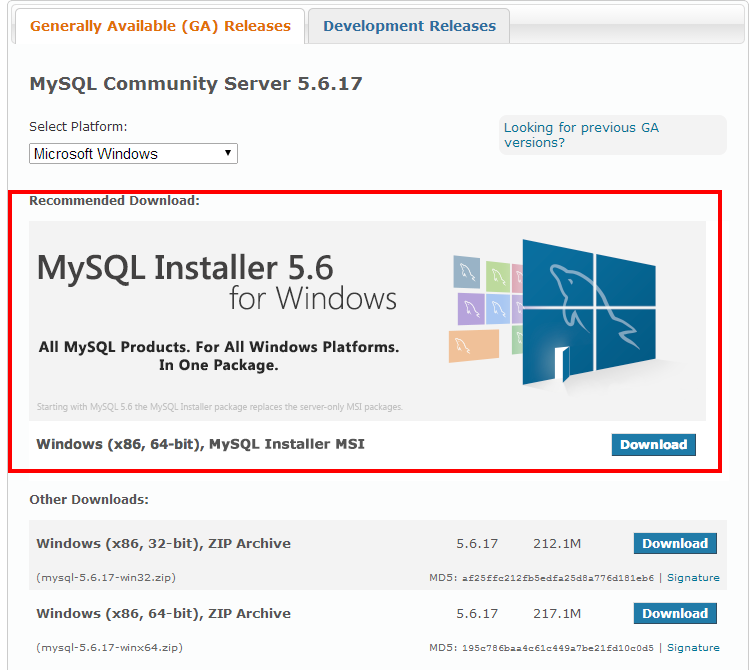
- At the row labeled Windows (x86, 64-bit), MySQL Installer MSI, click the DOWNLOAD button.
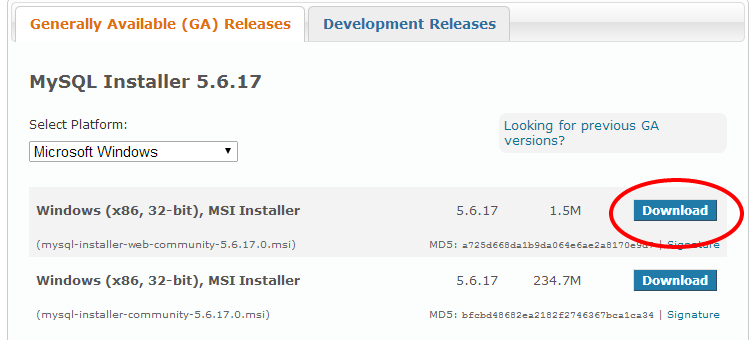
- In the MySQL Installer 5.# section, there are two similar-looking rows that both start with Windows (x86, 32-bit), MSI Installer. At the first row, click the DOWNLOAD button.
- The next page gives you an option to create an Oracle Web account prior to downloading MySQL. You can skip this option by clicking the link at the bottom of the page that says No thanks, just start my download.
- Save the MySQL installation file to your computer.
- Run the MySQL installation file.
- During MySQL installation, use Advanced Configuration > Show Advanced Options to set the MySQL Root Password to mysql.
- During MySQL installation, use Advanced Configuration > Show Advanced Options to set the MySQL Root Password to mysql.
additional documentation needed in this section:
- need more detail under "Run the MySQL installation file"
- need to run as administrator – requires opening a command prompt as administrator, then running the msi from within that command prompt
Initialize MySQL data
- Open the MySQL Workbench: Windows Start Menu > All Programs > MySQL > MySQL Workbench #.# CE (where #.# is a version number). Ie patient.
- When MySQL Workbench opens, click the box under MySQL Connections that is labeled MySQL## (where ## is a version number). A login box will be come up titled Connect to MySQL Server.
- For the Password, type mysql and click OK.
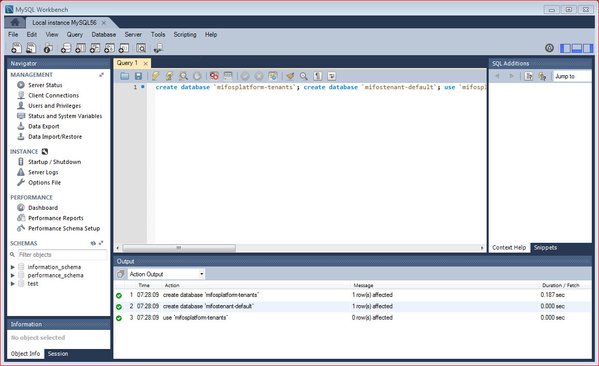
- Copy the following database command and paste it into the large white box titled Query 1:
create database `mifosplatform-tenants`; create database `mifostenant-default`; use `mifosplatform-tenants`;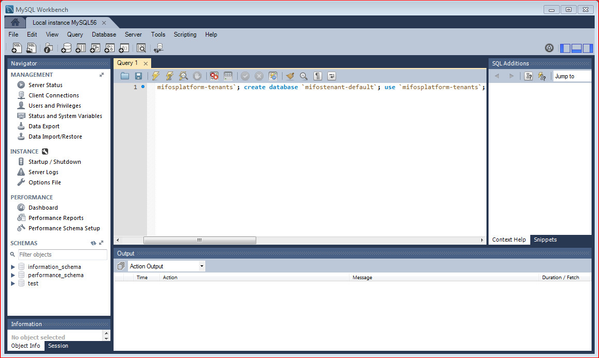
- Run the above database command from the MySQL Workbench menu, by clicking Query > Execute (All or Selection).
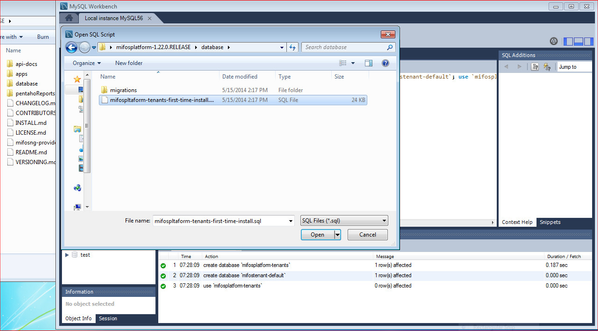
- Open and run the first-time-install MySQL script.
- In the MySQL Workbench menu, click File > Open SQL Script.
- Navigate to the location where you extracted the Mifos X application files.
- Navigate to the database folder inside that location.
- Select the file mifospltaform-tenants-first-time-install.sql and click Open.
- Run the first-time-install script from the MySQL Workbench menu, by clicking Query > Execute (All or Selection).
- From the MySQL Workbench menu, click File > Exit to close MySQL Workbench.
Install Tomcat
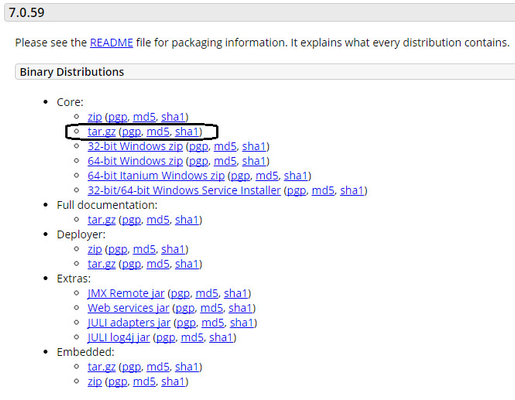
- In your web browser, go to http://tomcat.apache.org/download-70.cgi (Please refer Compatible software versions)
- Under the section Binary Distributions>>Core, click the link tar.gz to download.
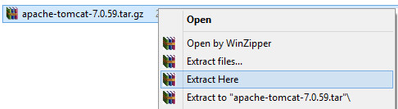
- Extract apache-tomcat-7.0.59.tar.gz:-
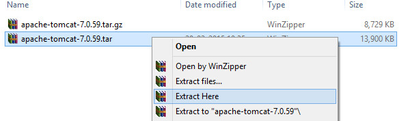
4. Again, Extract apache-tomcat-7.0.59.tar:-
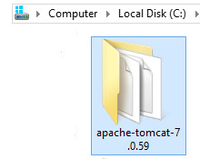
5. Folder: apache-tomcat-7.0.59, gets extracted:-

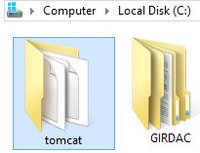
6. Copy, Paste apache-tomcat-7.0.59 folder to c:\ and then Rename it to tomcat
Tomcat 7.0 Setup
- Ensure the following libraries are in the [TOMCAT_HOME]/lib folder:
- mysql-connector-java-5.1.22 (You will need to download latest MySQL Connector/J Jar file from http://dev.mysql.com/downloads/file.php?id=457911)
Once it's downloaded copy only the MySQL Connector/J jar file then paste that to Tomcat>>lib folder. - tomcat-jdbc.jar

If you are missing it use the following link to download: http://www.java2s.com/Code/JarDownload/tomcat-jdbc/tomcat-jdbc.jar.zip
- mysql-connector-java-5.1.22 (You will need to download latest MySQL Connector/J Jar file from http://dev.mysql.com/downloads/file.php?id=457911)
- Generate a new keystore using java keytool (if you havent already done this):
- Create keystore
- for Windows:

Open command prompt
>>Go to the path where your JAVA>>bin folder is located.
>>Run this command to generate the key:- keytool -genkey -alias tomcat -keyalg RSA
>>Then provide the password.
Ex:
Provide input and type in y for the last question to confirm.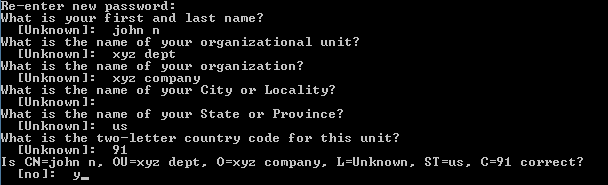
- for Unix:
- for Windows:
- Update server.xml as in docs with the following command:

- Create keystore
- Update tomcat configuration files for SSL
- Go to [TOMCAT_HOME]/conf and open server.xml with notepad:
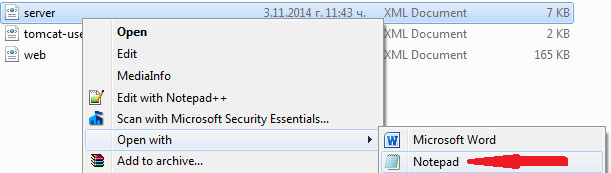
- Delete everything in it and copy-paste the following code:
<?xml version='1.0' encoding='utf-8'?> <Server port="8005" shutdown="SHUTDOWN"> <Listener className="org.apache.catalina.core.JasperListener" /> <Listener className="org.apache.catalina.core.JreMemoryLeakPreventionListener" /> <Listener className="org.apache.catalina.mbeans.GlobalResourcesLifecycleListener" /> <Listener className="org.apache.catalina.core.ThreadLocalLeakPreventionListener" /> <GlobalNamingResources> <Resource name="UserDatabase" auth="Container" type="org.apache.catalina.UserDatabase" description="User database that can be updated and saved" factory="org.apache.catalina.users.MemoryUserDatabaseFactory" pathname="conf/tomcat-users.xml" /> <Resource type="javax.sql.DataSource" name="jdbc/mifosplatform-tenants" factory="org.apache.tomcat.jdbc.pool.DataSourceFactory" driverClassName="com.mysql.jdbc.Driver" url="jdbc:mysql://localhost:3306/mifosplatform-tenants" username="root" password="[root mysql password]" initialSize="3" maxActive="10" maxIdle="6" minIdle="3" validationQuery="SELECT 1" testOnBorrow="true" testOnReturn="true" testWhileIdle="true" timeBetweenEvictionRunsMillis="30000" minEvictableIdleTimeMillis="60000" logAbandoned="true" suspectTimeout="60" /> </GlobalNamingResources> <Service name="Catalina"> <Connector protocol="org.apache.coyote.http11.Http11Protocol" port="8443" maxThreads="200" scheme="https" secure="true" SSLEnabled="true" keystoreFile="/home/ubuntu/.keystore" keystorePass="testmifos" clientAuth="false" sslProtocol="TLS" URIEncoding="UTF-8" compression="force" compressableMimeType="text/html,text/xml,text/plain,text/javascript,text/css"/> <Engine name="Catalina" defaultHost="localhost"> <Realm className="org.apache.catalina.realm.LockOutRealm"> <Realm className="org.apache.catalina.realm.UserDatabaseRealm" resourceName="UserDatabase"/> </Realm> <Host name="localhost" appBase="webapps" unpackWARs="true" autoDeploy="true"> <Valve className="org.apache.catalina.valves.AccessLogValve" directory="logs" prefix="localhost_access_log." suffix=".log" pattern="%h %l %u %t "%r" %s %b" /> </Host> </Engine> </Service> </Server> Press Ctrl + S or File>Save.Close Notepad.
Below mentioned are to be updated in the same server.xml
i - Key store path should be updated like shown in example here:- keystoreFile="C:\Users\conflux9\.keystore"
ii - Key store password (which was provided while creating the key). Should also be updated like shown in example:- keystorePass="mif456"
iii - Provide your mysql user name and password, like in this example:- username="root"
password="mysql"
- Go to [TOMCAT_HOME]/conf and open server.xml with notepad:
- Dropping application into tomcat webapps folder
a) Copy "mifosng-provider.war" file from downloaded mifos-platform folder:
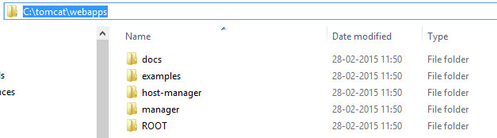
b) Paste it to - WEBAPPS Folder i.e C:\tomcat\webapps
c) Copy "community app" folder from downloaded mifos-platform>>apps folder:

d). Paste it to - ROOT Folder i.e C:\tomcat\webapps\ROOT
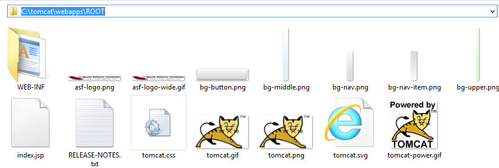
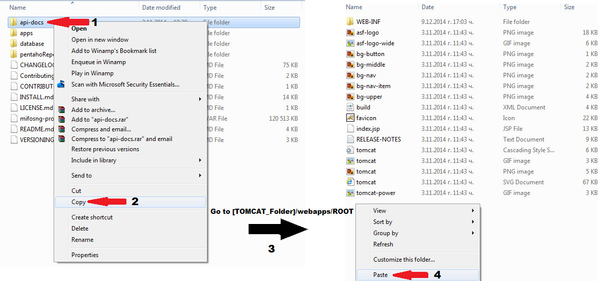
e) Copy-paste the entire api-docs folder to [TOMCAT_HOME]/webapps/ROOT folder.
Create .mifosx folder in home directory
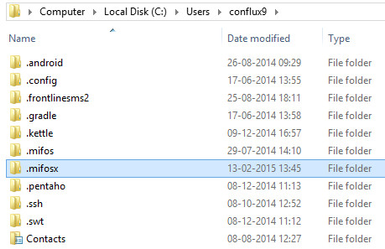
Use command prompt for creating .mifosx folder i.e

Copy Pentaho Reports folder from downloaded mifos-platform folder
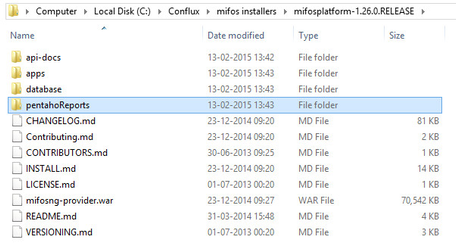
Paste it to .mifosx folder

Create Environment Variables
- Open your Environment Variables: Start Menu > Control Panel > System and Security > System > Advanced System Settings > Environment Variables.
- Create CATALINA_HOME variable:
- Under the System Variables section (the bottom of the two sections), click the New... button.
- For Variable Name, copy and paste this: CATALINA_HOME
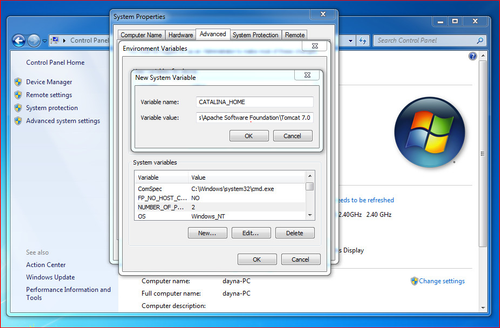
- For Variable Value, Provide the tomcat path i.e C:\tomcat
- Click the OK button to get it created.
- Create JAVA_HOME variable:
- Click the New... button again, under the User Variables section.
- For Variable Name, enter JAVA_HOME
- For Variable Value,Provide the Java path enter C:\Program Files\Java\jdk1.7.0_67
NOTE:
i - If you are running 32-bit Windows 7, use this instead: C:\Program Files (x86)\Java\jdk1.7.0_67
ii - Java jdk path "jdk1.7.0_67" will be with respect to the installed version and it may not be the same as mentioned in the above example.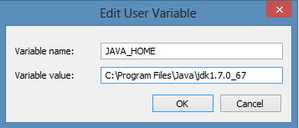
- Click the OK button.
- Edit PATH variable:
- In the System Variables section, scroll down to and select the Path variable.
- Click the Edit button just below.
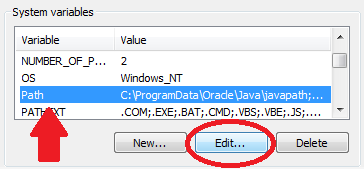
- Click your mouse cursor into Variable Value box. Using your keyboard's right-arrow or End key, move all the way to the far right of the current text in Variable Value.
- Add the following text onto the end of the existing Variable Value text: ;C:\Program Files\Java\jdk1.7.0_67\bin
NOTE:
i - There must be exactly one semi-colon between whatever is already in your PATH variable, and the new C:\Program Files\Java\jdk1.7.0_67\bin – don't add a semi-colon if your previous PATH already ended with a semi-colon.
ii - Java jdk path "jdk1.7.0_67" will be with respect to the installed version and it may not be the same as mentioned in the above example.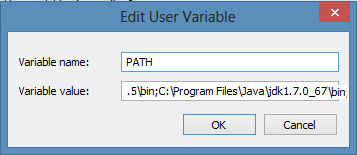
- Click the OK button
4. Create JAVA_OPTS variable:
- a. Click the New... button again, under the User Variables section.
- b. For Variable Name, enter JAVA_OPTS
- c. For Variable Value, example -Xms1024m -Xmx1024m -XX:MaxPermSize=512m
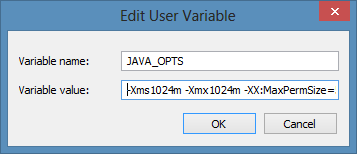
For more details refer: PermGen Out of Memory
Starting the application
Run "startup.bat" by click it. It should be available in "C:\tomcat\bin" folder
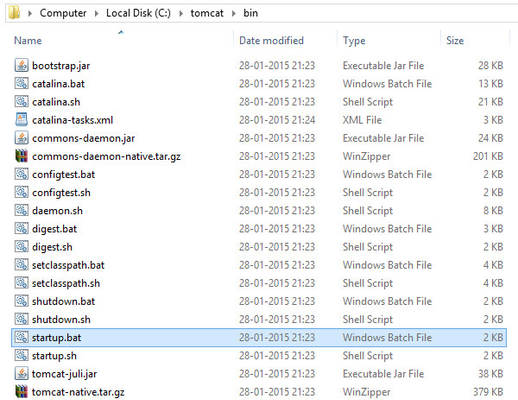
Note: You can create a shortcut of "startup.bat" on your desktop and rename it as start mifosx.
Application gets started
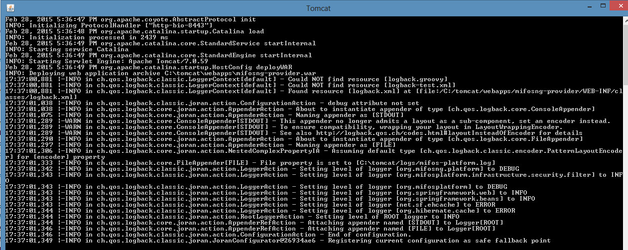
Once "Server startup in xxxxx ms" is shown

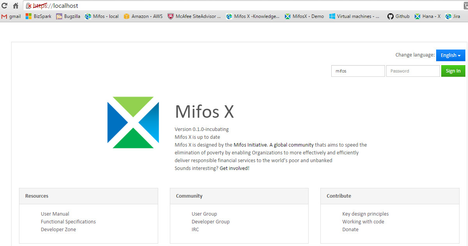
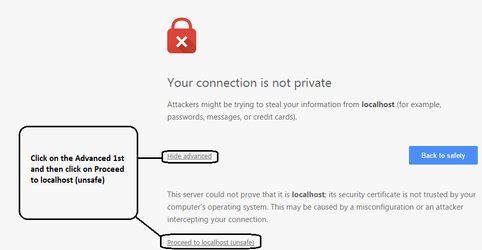
Go to the browser and access mifos x:-

For the first time access it will show like please click on proceed:-
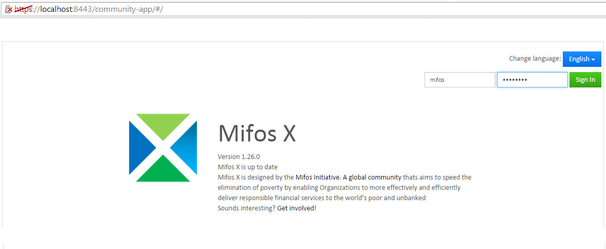
Login into Mifos X, Provide user name: mifos and password as: password
Note: API docs should be available @ https://[server ip address]:8443/api-docs/apiLive.htm
Links:-
A very helpful YouTube installation demonstration was recorded on February 13, 2014. It can be viewed here:
Please refer: Compatible software's
Related articles