Custom Reports
Stretchy Reports:
To create a new custom report, the Developer/Specialist writes the relevant SQL queries, adds it to the reporting metadata and adds any parameters required. Stretchy Reports are also known as "Screen Based Reports" or "Table Reports". Stretchy Reports work great for on-screen display and for exporting data to spreadsheets.
Creating Stretchy Reports:
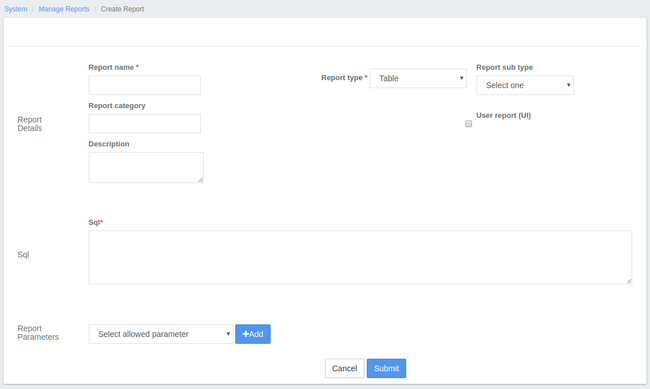
Go To Admin >> System >> Manage Reports and Click on '+ Create Report' tab to see the following window:
The following SQL Query is used as an example:Example
Select c.id clientId, CONCAT("\"",c.display_name,"\"") clientName, ounder.name officeName from m_office o
join m_office ounder on ounder.hierarchy like concat(o.hierarchy, '%')
join m_client c on c.office_id = ounder.id
where o.id = ${officeId}Parameter: Select office
- The Stretchy Report requires you to fill the following fields before it gets generated:
| Field Name | Drop-Down Parameters | Description |
|---|---|---|
| Report Name | None | Provide the name for the report, so that users can search for it using this name. |
| Report Type |
| If you're creating a Stretchy Report, select 'Table'. If you're creating a Pentaho Report, select 'Pentaho'. If you're creating a 'Chart' Report (like Bar, Pie, etc.), select 'Chart'. |
| Report sub type |
| If you have selected the Report Type as 'Chart' , you need to select Report sub type as either Bar or Chart. |
| Report Category | None | Provide the Report Category (for example: Clients, Loans, Savings, Accounts, etc.) to which the Report belong to. |
| Description | None | Give a small description about the report being generated. |
| Use Report | None | If you check it, the report is ready to be used once it's created. If you leave it unchecked , the report name won't be shown in the list of Reports, even though it will be created. This option is used when the report creation is still under process. |
| Sql | None | Here, you need to write the SQL Query to generate the required report. In order to write SQL queries, you need to have a basic understanding of the following:
|
| Report Parameters |
| Select the available parameter from drop-down list and click on '+Add' button. You can select more than one parameter as per the requirement of your project. |
3. After filling in the required parameters, click on the 'Submit' button to generate the report.
4. To view the Report, click on 'Reports' tab and either search for it by Report Name, or go to the specific category to which the report belongs to and select the report.
Modify existing Stretchy Reports:
To modify an existing Stretchy Report:
- Go to Admin >> System >> Manage Reports to see the list of Stretchy as well as Pentaho Reports.
- Click on the specific report you want to modify. It will show the highlights of the Stretchy Report as shown in the screenshot below:
Click on the 'Edit' button to modify the Report.
Once you modify the report, click on the 'Submit' button.
Create and Upload Custom Pentaho Reports:
Stretchy Reports vs Pentaho Reports:
| Sl.No | Stretchy Reports | Pentaho Reports |
|---|---|---|
| 1 | They lack formatting options for reports to be created. | You can format texts, column headings and tables. |
| 2 | Not suitable for big and complex reports. | Pixel-perfect reports can be created irrespective of their size and complexity. |
| 3 | Can only be exported to spreadsheets. | Can be exported to HTML, Excel, PDF, Text, etc. |
| 4 | Very simple to create and can be created using the community-app front-end for Mifos X. | It needs a separate tool ("Pentaho Report Designer"), which allows us to create Pentaho reports and later embed those reports in Mifos X. |
| 5 | Better suited for simple reports having less or no formatting options | Better suited for complex reports having a lot of formatting options |
For more information on how to create Pentaho Reports, click here.
Related articles

